
Home
Dust Collection Basics
Equipment
Ducting & Hoods
Wood Toxicity Table
Testing
FAQs
Projects
Administrative
Financial Help
Contact & Email

Cyclone Kits
- Important Announcement!
The kit business is on indefinite hold with no kits available for shipping. This business belongs to my son and daughter, and both are out of the area so cannot operate this business. My son may reopen operations after he graduates in May 2018. I don't have either the time or health to run the kit business, so all is on hold pending his or her return. In the interim we do not have any kits available for shipping, but I do continue to have kits cut for local pick up. Also, my son did leave me with a few partially assembled cyclones available for local pick up only. I do still help a few build cyclones here with me as well, but only as time is available.
- Inspiration
When I took a serious look at the fine dust situation, the results were a mess.
All Dusts - There were over one hundred million references to fine dust risks and many very prestigious organizations and even government organizations contradicted each other. My doctor said to stick to the medical information verified by expert physicians. Fine dust is so heavily studied that doctors call it inhalable dust as it gets right past our normal protections then often lodges stuck deep in our lungs. Medical researcher so frequently study fine dust that they use a shorthand of PM10 meaning particle material sized under 10 microns. The medical research shows fine dusts which by definition are particles smaller than 10-microns, meaning they are invisible without magnification slip right by our natural protections and go deep into our lungs. Fine dust particles are so light with so much surface area that normal room air currents will keep fine dust airborne and rapidly contaminate all shared air. Even very light airflow will stir settled fine wood dust particles airborne again and again. The peer reviewed medical information shows every exposure to fine dust of any type causes a measurable loss of respiratory function, some of this loss becomes permanent, and the more and longer the exposure the greater the health damage. The damage from each exposure is so tiny that most never know they are building a problem, plus we have so much excess respiratory capacity that unless we have a bad allergic reaction, get poisoned or develop cancer, we never know of any problems as they occur. Although respiratory damage is rarely the cause of death, respiratory damage can significantly worsen other age related health problems that do kill us. This is why the EPA sets really tough indoor air quality standards allowing only 0.1 milligrams of dust per cubic meter of air. This is a tiny amount of fine dust. Most small shops are in typical two-car garages with no ventilation and less than 100 cubic meters of air. This means a typical small shop exceeds the EPA air quality limits as soon as 10 milligrams of fine dust gets launched airborne. We easily launch more than 10 milligrams of fine dust when we slap a dusty shop apron or hand saw just over seven inches of a typical 3/4" thick board.
Wood Dusts - Wood dust particles are particularly bad news. Electron microscope images show fine wood dust particles are covered with razor sharp edges and extended sharp often barbed points which more seriously damage and scar our tissues and cause these particles to get lodged trapped deep in our tissues where it is very difficult for our bodies to get rid of them. Wood dusts contain and carry toxic chemicals that these trapped particles can release for an extended time. Woodworking also makes huge amounts of fine dust compared to how little it takes to harm our health.
Wood Dust Risks - Most large woodworking facilities vent their dust collection systems outside, so fine dust exposure is limited to the dust being made. Still, woodworking makes so much fine dust that the insurance data for large facility woodworkers is terrible. Fine dust exposure causes one in seven to develop such bad allergic reactions they must stop woodworking, one in fourteen is forced into an early medical retirement, some get poisoned and develop nasal cancers and all lose about 1% of their respiratory capacity per year of work which worsens age related health problems and shortens lifespans.
Small Shop Risks - OSHA testing shows almost every small shop vacuum, dust collector, air cleaner, cyclone, and even many dust masks came with filters too open to provide good health protection. Upgrading filters to provide ample protection requires much larger filters than any major vendor provided. All dust collectors and cyclones allowed 100% of the airborne dust to go right through into the filters. Woodworking generates so much airborne dust that we must constantly clean our fine filters to maintain good airflow, plus airborne wood dust is so full of razor sharp edges and sharp often barbed points, that airborne dust causes most fine filters to fail roughly every months of full time woodworking. The decades of professional air engineering experience also shows that every dust collector sized under 3 hp and cyclone sized under 5 hp also lacks ample airflow for good fine dust collection.
Inspiration - This mess inspired me to invent a better separating cyclone. I had been working with cyclones for years, and many small shop vendors were already using my prior design. My prior design worked like other cyclones and used gravity to drop the heavier particles and chips. By definition airborne dust consists of particles sized under 30-microns which when vented outside vanish with no visible trace because they stay airborne long enough to spread so far they appear to vanish. Realizing that was just about as good as the gravity approach could provide, I instead used a directed air stream to do the separation and push the finest particles into the dust bin. My totally new kind of cyclone design separated off almost all of the traditional sawdust. It also was independent medical school tested to separate off 99.9% of all particles sized over 4.7-microns and provide over 80% separation of particles sized down to 2-microns. So instead of only separating around 85% of the total weight of dust produced by woodworking, my new cyclone desigbn actually separates over 98.5% of the total weight of dust produced. This was five times better airborne dust separation than its closest competitor, my prior cyclone design that most still use today.
Plans - I shared a scaleable spreadsheet in 2000 on these pages and allowed individuals to build these for their own use. Thousands built small shop cyclones from these plans. This new type of cyclone works exceptionally well and hundreds have shared saying things like, "I had to clean out my prior cyclone filter two or three times a day, but with your design I now only clean every three or four months." And, "Bill, this cyclone is amazing. We have a small commercial shop and had to replace expensive fine cartridge filters every three months. With your cyclone our Dylos Products air quality meter shows that after three years our filters still do not need replaced." Another said, "We used to have to replace expensive filters quarterly, so in less than two years our filter savings already paid back more than we paid for your cyclone." Thousands shared similar positive comments.
Kits - When many asked for help with the sheet metal work I designed a kit cyclone for my son and daughter to sell in 2002 as a way for them to earn a little extra spending money. My son initially cut the metal using my templates and I cut out the wooden parts using a router with templates. My daughter handled all the paperwork. More wanted kits than we could cut, so I got the metal pieces laser cut and paid a local shop to program and cut the 14" blower pieces. When he started high school we discovered he needed help with a learning disorder. At the same time as our daughter left for college, our son went out of state to a special school to help. That left me running the kit business. My health precluded that work, so I found help to take over that kit business.
Alternates - The first two firms who tried to make these kits failed, then in 2004 Ed Morgano, a retired plastics engineer, created Clear Vue Cyclones to help hobbyists and small shop woodworkers with affordable cyclones. He provided excellent service and priced his clear cyclone for little more than the cost to build a kit. We reached an agreement where only Clear Vue and my children can make and sell my cyclone design in trade for a royalty. I very much appreciate the great work Ed did for so many years. His good work and word of mouth advertising from many happy customers turned his part time Clear Vue venture into one of if not the top supplier of small shop cyclones. Between Clear Vue, my web page plans and kit sales now worldwide more than 10,000 small shop owners use and consider my cyclone design the best available.
Restart - Ed Morgano notified me well in advance that he had to sell his Clear Vue Cyclone business and retire on May 1, 2010. I honored his request to not disclose his intent to sell and retire, plus immediately began looking for someone to buy his business. I very much wanted another reliable firm to take over the manufacture of my cyclone design. In the interim while we were waiting for Clear Vue to sell, at my urging my son Mike resumed his metal kit business balancing his already too busy schedule with this extra work. Restarting his kit business with his busy schedule put a huge burden on me. I helped with assembly and did all vendor contacting, web page work, ordering, packing, shipping, and emails. High interest in these kits pushed my daily email volume from four hours a day to over eight. We provided many cyclones in this interim. We appreciate the many that placed orders and stayed patient as we dealt with the normal startup challenges. After two months operation his kit business proved profitable and ran smoothly, but was something he lacked the time or desire to do as more than a way to make a little extra spending money.
Clear Vue - My tired body and his overwhelmed schedule both appreciate Clear Vue reopening. My son does not want to compete with Clear Vue and dropped all sales of anything except his laser cut metal kits. Some like me enjoy making our own things or really want a metal cyclone but are layout and cutting challenged. To make a little extra spending money he continued to sell the unformed kits, plus built about one cyclone a week during the summer college vacation and about one a month when school restarted so maintained a waiting list. He will not accept payment or deposits until he has a unit ready as keeping up with the demand with his busy schedule proved far too disruptive and forced us to hire an independent contractor that burned up his modest profit. Most find that Clear Vue does such a good job and prices their products so competitively that it is less expensive to buy from them.
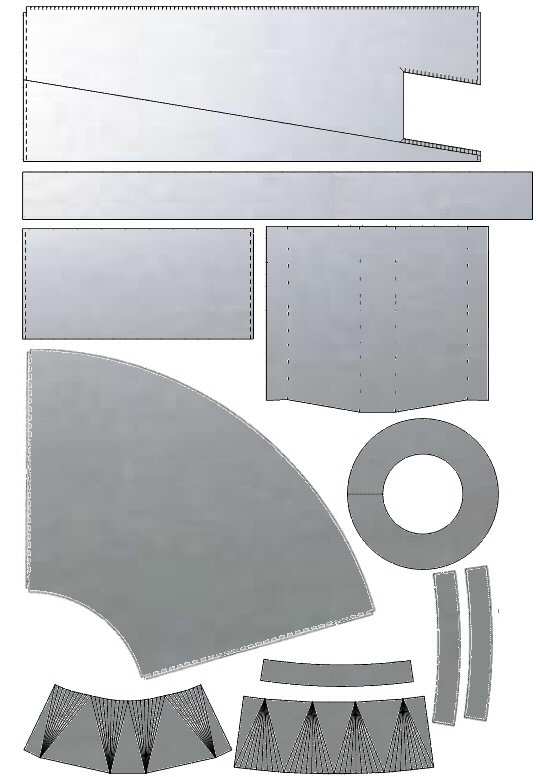
Kit Upgrades - His cyclone kits with cut metal parts save about twenty hours work to chase down metal, do accurate layout, and provide laser cut metal parts accurate to 0.002". Our precision laser cutting ensures all parts fit precisely without errors or wasted efforts. Also, just like the current Clear Vue Cyclones our metal kit parts improve on my web page design with tapered fittings, transitions, and other features such as alignment marks, notches, and cutouts to ensure proper fit and nice tight joints making his kits far easier to assemble than building your own from just our plans. Many have asked, and I have no interest in sharing these minor improvements on the plans. The problem is we have already had five different firms go into production using my CAD files to build identical cyclones and kits. Not only do we get nothing from their sales, they all had the audacity to refer their customer questions to me to respond. Although use of a slip roll, metal brake, and beading machine speeds up building, most can build these kits with no prior sheet metal experience using just a few easily made inexpensive jigs. You will need to add your own motor, impeller, blower housing, electrical, wall mount, dust bin, and ducting. - Offerings
We only offer an 18" diameter cyclone kit. You can make this as either a left or right handed cyclone simply by which way you roll the top. We do not sell blower housings, wooden parts, wooden transitions, motors, impellers, blowers, relays, cords, plugs, different sized cyclones, custom sizes, vacuum cleaner cyclones, etc. My web pages share detailed building instructions, jigs to make assembly easier and links to Clear Vue and other vendors that supply all parts needed to build your own cyclone.
- Cyclone Kit
 Our 18" diameter P1800 sheet metal cyclone lets you build the most current version "Bill Pentz" cyclone design sold by Clear Vue Cyclones that you can also make from my free plans on these web pages. This kit only contains the flat sheet metal parts to build the cyclone body and an inlet transition to connect the cyclone to a 6" flex hose or duct. These kit parts produce a more refined cyclone than my basic design because the kit includes tapered fittings to better attach hoses, plus etched alignment lines, alignment notches, tabs and slots that speed up assembly and accuracy. Additionally these kits now include tabs and slots to make assembly even easier.
These precision laser cut 22-gauge galvanized cold-rolled sheet steel parts let you build a tough rigid cyclone that needs no reinforcement. Most find this heavier steel more expensive and too tough to hand cut so they use lighter metal. I do not recommend using thinner than 24-gauge steel. Use of the 30-gauge air ducting metal that other kit plans recommend creates a cyclone that requires additional reinforcement. Our blowers create enough suction to cause lightweight metal to snap and pop when the cyclone gets turned on and off.
The kit includes a 6" O.D. bottom dust chute, 4.5" x 9" rectangular inlet with transition to a 6" connection to attach to your ducting, and a 9" cyclone outlet on the cyclone top which should mate with your blower. You can trim off a bit of the transition to your ducting and use a slightly larger taper to permit you to attach to either 7" or 8" diameter main duct. I recommend use of a short piece of the right sized flex hose to go between the cyclone transition and your ducting mains to help keep the noise down as the flex does not carry the vibrations from the cyclone to your ducting. The kit contains an internal helical air baffle, commonly known as an air ramp to reduce turbulence and improve efficiency. Cone size uses the near ideal 1.64 sizing multiplier to make them more efficient at separating off the finest unhealthiest dust.
 The cut metal shown on the right is the full kit that includes transitions and blower side metal. It does not include the heavy metal blower plate which must be ordered separately.
This is a kit that just builds the cyclone body, so you need to make or purchase all other items. You need a wooden cyclone top, blower housing, blower impeller, blower motor, electrical parts, mounting hardware, hoses, ducting, fittings, and dust bin. You can buy a blower housing or make your own from the free plans on my web pages.
This cyclone kit provides excellent separation for use with blowers down to 1.5 hp. Unfortunately blowers smaller than 3.5 hp and impellers smaller than 14" in diameter fail to move ample air to provide good fine dust collection. These airflow requirements were set by those firms who guarantee customer air quality after decades of air engineering and experience with how much air we need to move at our larger stationary tools for good fine dust collection. Since motors come in either 3 hp or 5 hp and 3 hp is too small, I recommend you use a 5 hp motor. I personally use and recommend the excellent quality Leeson 5 hp U.S.A. made motor. It makes no sense to me to use a cheap poor quality motor for the most heavily used motor in our shop. The Leeson motor can power a 15" diameter impeller which is the smallest that will give you the full 1000 CFM you need through 6" diameter duct, but I recommend you use a 16" diameter impeller to best use the horsepower of this motor.
You can make this kit into either a left-handed or right-handed cyclone, but most motors require impellers that turn counterclockwise when viewed from the blade side which requires left handed cyclones for best air movement. If made incorrectly your cyclone turns that air in the opposite direction as your blower. A blower wastes about 1/2 hp to reverse the spinning air direction.-
Cyclone Kit Dimensions
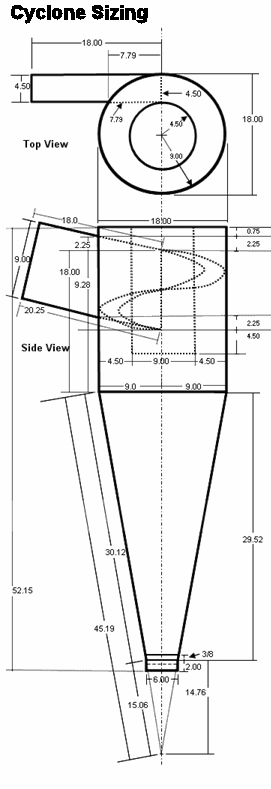 The detailed plans shared on my cyclone and blower designs remain just a little larger than our kits. The kits produce an 18" interior diameter cyclone. It stands 52" tall not including blower, blower motor and collection bin. Although this kit is slightly shorter than the cyclone on my Cyclone Plans pages it only fits under a standard 8' ceiling if you use a short collection drum. You need a taller than 8' ceiling to use a 55-gallon drum or standard 30-gallon galvanized trashcan for your dust bin.
- Construction
The kit may be assembled with screws, rivets, soldered, or welded together, but we recommend soldering. Using the solder and flux recommended on the Build Cyclone pages makes for smoother joints and a better looking stronger cyclone that provides higher separation efficiency. Still, many build these with just pop-rivets and polyurethane sealant. Don't use silicone caulk on galvanized metal because it reacts with zinc galvanizing and eventually comes loose. Spot welding and TIG welding work well but require specialized expertise, tools, and supplies. Welding, brazing and overheating galvanized metal produces potentially toxic fumes so use a well ventilated area.
- Cyclone Pricing
My son sells the bare unformed flat metal cyclone sheet metal kit for $199 plus $112 continental U.S. shipping, handling, insurance, and packing charges.
This same kit plus the sheet metal blower side and metal blower outlet transition costs $229 plus $129 continental U.S. shipping, handling, insurance, and packing charges.
For $299 you can get on his list to buy as they get made this same kit with all the metal rolled, folded, flanged and formed. These must be picked up locally as we do not ship formed parts.
For $399 you can get on his list to buy a completed cyclone. These must be picked up locally as we do not ship formed parts.
-
Cyclone Kit Dimensions
-
Blower Housing
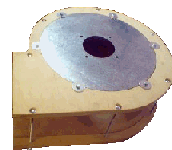 My web pages give blower templates and detailed dimensioned plans to make your own blower housing, but with Clear Vue back in operation my son stopped selling blower housings when he used up his inventory. These housings contain the wooden blower top, bottom and heavy metal motor plate. The top and bottom sandwich a 6" wide metal side between the wooden blower top and bottom to produce a good looking effective blower. If you want the blower side metal you must either buy it with the cyclone kit or get it cut yourself.
Key to this blower housing is the heavy motor plate. This plate fits our recommended Leeson motor with standard 56C face frame mount and this plate provides the base that supports everything else. Most use vibration dampeners and attach this motor plate to either a wall or ceiling mounted rack. This supports blower motor, blower, and cyclone. This also lets you remove the blower housing and cyclone without having to take down the heavy motor and impeller. All other small shop cyclone designs require you to take all down including the heavy motor and impeller every time you clean your impeller or have to remove a jam from your cyclone. All cyclone blower impellers should be regularly inspected and cleaned to remove any built up pitch otherwise the impeller can get out of balance and damage your motor bearings. Cyclones move lots of air and can suck up trim pieces, scraps, small tools or other items like my shop apron. Also, cyclones sometimes plug when we let the dustbin overflow. Being able to do your inspections and cleaning without having to remove then reinstall the heavy motor and impeller will save your back.
Unlike the Clear Vue blower kits that came with all the hardware, my son's blower kits require you to provide your own hardware. You also need your own impeller, impeller arbor, motor, electrical, and blower outlet.
This kit will not fit or work with airfoil or impellers of different sizes. Although you can form the cyclone top to work with either clockwise or counterclockwise airflow, you need to ensure your blower motor turns the proper direction for your impeller and should make the cyclone compatible. My web pages provide free plans to build blowers that work with airfoil impellers, impellers that turn in the other directions, and some different sized impellers.-
Blower Dimensions
Our blower spiral opens to 21" in diameter with a height of roughly 7" depending upon the depth of your grooves in the blower wooden pieces and width of the side metal. Adding the 11" tall Leeson motor gives a total height of about 18". The Leeson motor does not need any clearance above because the air is drawn in from the side so it can be mounted flush to the ceiling. The blower bottom wooden plate is secured with six screws that let you position the blower to face in any direction you desire.
- Blower Pricing
Blower kits cost $145 plus $65 continental U.S. shipping, handling, insurance, and packing charges. Add $15 for an unformed metal transition. Add $35 for a wooden transition including shipping to go to a set of filters. California residents must also pay sales tax.
- Blower Cautions
Never run an impeller without a blower housing. You can be hurt and the impeller will move so much air it can quickly burn up your motor!
An impeller spinning at 3450 RPM turns at nearly 60 revolutions PER SECOND and generates in over twenty tons of force. If the impeller slips down the motor shaft, a light aluminum impeller gets hit and shatters, or a blade breaks this spinning impeller becomes potentially deadly. An impeller I tested slipped on the motor shaft causing the blades to impact the blower housing. One blade broke its welds and that blade tore through the 18-gauge steel blower sides like a knife through soft butter.
Also NFPA no longer recommends use of aluminum alloy impellers in dust collection systems because when hit with steel these impellers shoot off sparks like a sparkler which can trigger a fire.
Regardless of what other vendors may sell please do not use homemade or aluminum impellers. If you use set screw secured impellers please use new star tipped set screws every time you remove your impeller.
-
Blower Dimensions
- Motors
Many motors will work, but the details remain important. You need a face frame type motor so mounting it on a blower does not cover the motor cooling ports. You need a good quality motor with tough starting components as starting a heavy steel impeller means the motor works very hard during startup and gets warm. You need a motor with good heavy bearings to support turning a heavy blower wheel. You need to make sure that the motor when viewed from the motor shaft end turns counterclockwise and that you also get an impeller that is designed to turn counterclockwise, or that you can reverse the motor direction. You also need a motor powerful enough to turn the impeller when it moves maximum airflow.
 .
.
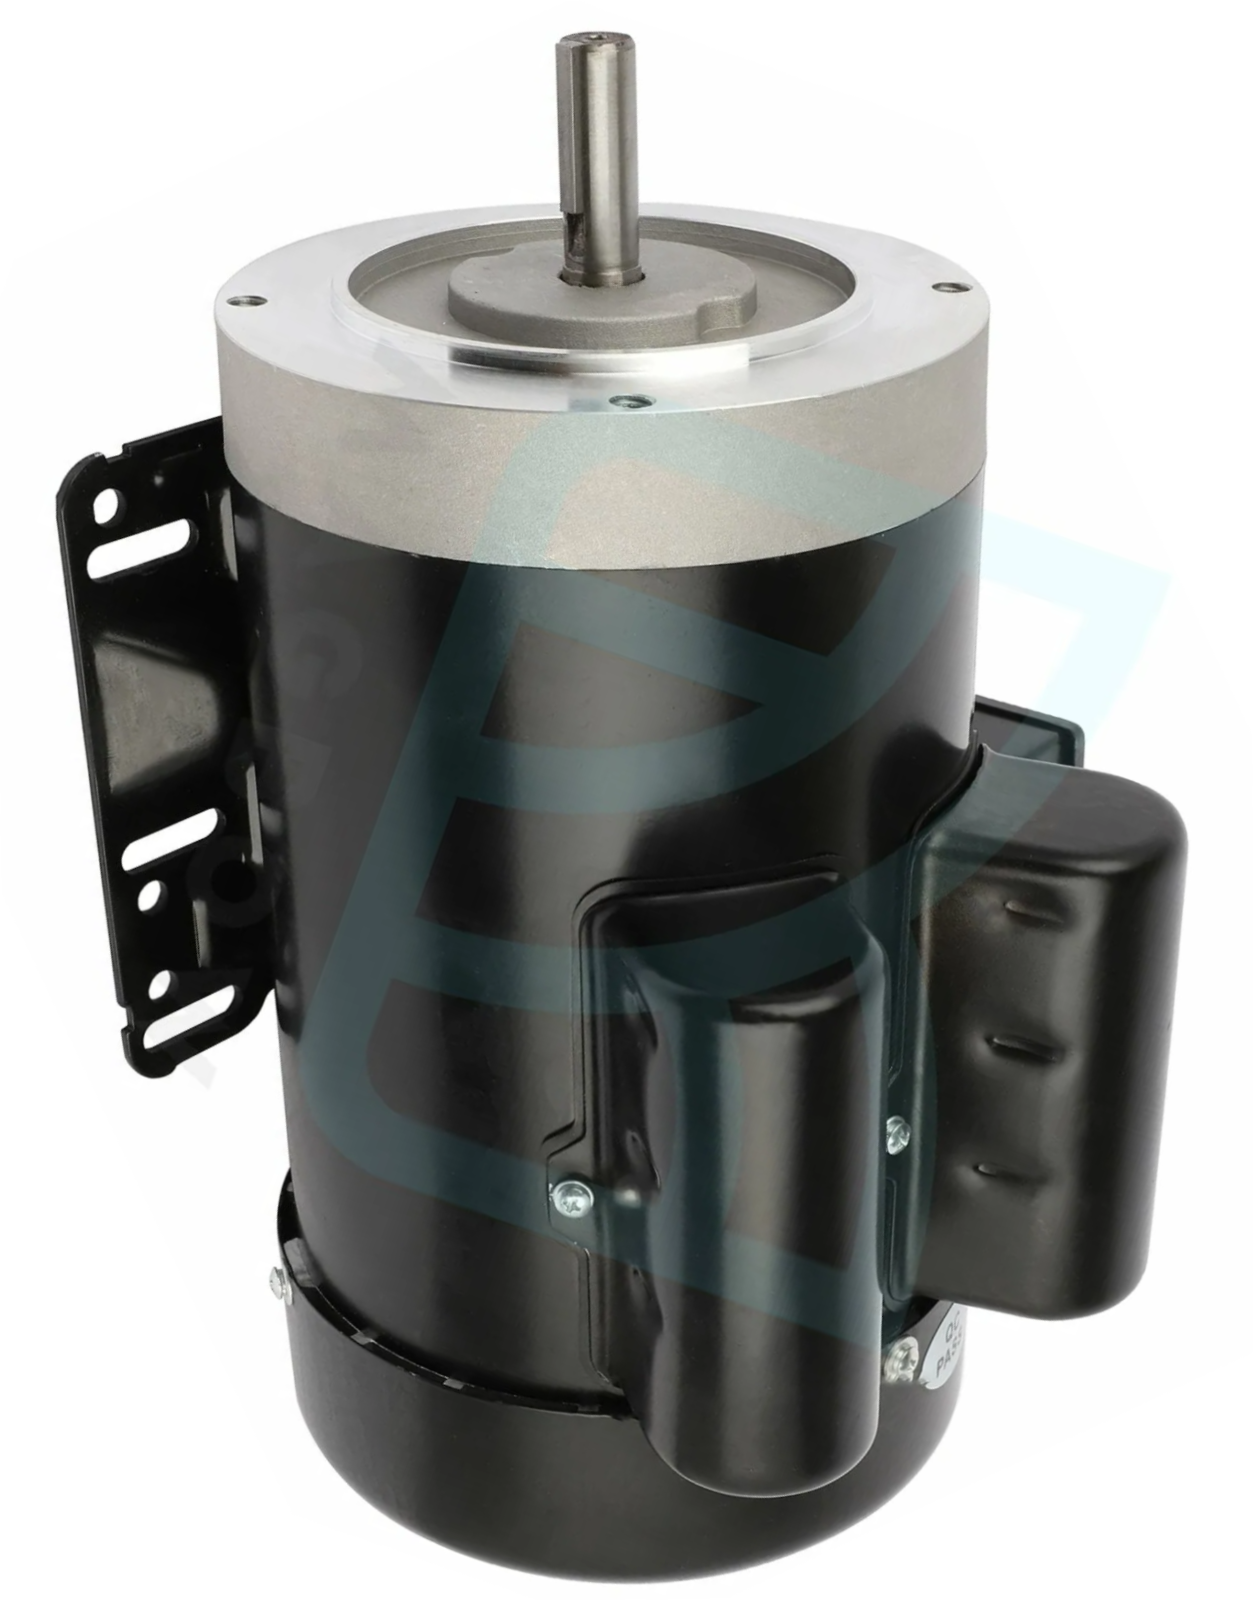
Moving our 1000 CFM against the overhead of dirty filters, ducting, tool hoods, etc. means that our motor when pushing more air because we have clean filters and minimum overhead will draw 3.5 horsepower. Custom motors are prohibitively expensive so that leaves us having to choose a standard motor. The standard compressor duty motors that are heavy enough to handle our blowers only come in either 3 hp or 5 hp sizes. Yes, we can squeak by with a 3 hp by cheating and buying a motor that can handle an extra load for a while, but it made no sense at all to me to use poor quality or a marginally sized motor running at over 100% capacity for the most heavily used motor in our shop. I tested a few inexpensive motors and they burned up easily, so I went to my motor expert and decided we needed a real 5 hp motor. I settled on either a Leeson or Baldor motor, but dropped Baldor when they moved their small motor manufacture outside of the U.S. I worked closely with Leeson to adapt a face frame mount to their heavy duty 5 hp compressor motor that has a 7/8" motor shaft. Clear Vue Cyclones, Electric Motor Warehouse and Electric Motor Repair and Sales of Greensboro, Inc. all provide this same excellent Leeson real 5 hp 3450 RPM motor with the upgrade face frame mount we need to attach the motor to the blower plate and ensure good cooling.
Remember you will also need four motor mounting bolts to fit your motor with washers and lock washers, a motor switch, and motor power cord and outlet to fit your power source. - Impellers
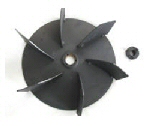 Always make sure your impellers are professionally manufactured and balanced material handling impellers. I recommend you power our cyclone with a backward curved (BC) material handling impeller to minimize blower noise. Although star tipped set screws work, I prefer the convenience and safety of impellers with compression hubs to avoid slipping on the motor shafts. You need at least a 14" diameter BC impeller powered by at least a 3.5 hp motor to move ample air to drive this cyclone, push air through my recommended filters and still supply the 1000 CFM airflow needed to provide ample airflow to meet the major air quality standards.
A 14" BC diameter impeller is the smallest to power my cyclone and have the 1000 CFM airflow recommended by those firms that guarantee customer air quality. If you use a 14" impeller then all of your ducting and down drops must be 7" in diameter. If you use 6" ducting with this size impeller you will only get about 785 CFM airflow. WMH Tools sells Jet and Powermatic DC-1900 excellent 14" impellers for a very reasonable price of around $100. Unfortunately, these come with proprietary hub that needs replaced to work with a standard motor shaft. I made arrangements with Inchs Machinery of Loomis California (916) 652-0628 to offer replacement taper lock hub arbors that will let these impellers work with standard 7/8" keyed motor shafts.
Because I selected a 5 hp motor as ideal to power these cyclones and the optimum 14" diameter BC impeller only pulls about 3.5 hp maximum, I came up with larger impellers to use that extra horsepower and let us use smaller ducts. I paid to have this impeller tested and certified and made arrangements for two firms to make and sell my impeller design. The first firm changed hands and the new owners chose to discontinue impeller sales leaving only Clear Vue making my design. Clear Vue impellers can be special ordered with different compression hubs to fit other motor shaft sizes.
When Clear Vue Cyclones closed temporarily I contracted with a local machine shop to make an even further improved impeller design that is a taller 15.5" diameter impeller. Getting these made proved slower than expected, but was worth waiting for as they work better than the 15" and 16" impellers I engineered for Clear Vue. When Clear Vue reopened, they found the cost to make my revised design too expensive so they resumed making the prior 15" and 16" diameter impellers. There were insufficient orders for my local machine firm to keep making the revised impellers so they are no longer available. So today most buy their impellers from Clear Vue. I strongly recommend the 16" instead of the 15".
There are a number of other viable impeller options. Murphy Rogers sells an excellent 15" diameter impeller that requires the 1 1/8" motor shaft rather than the Leeson 7/8" shaft. Cincinnati Fan sells an excellent 14" BC impeller that will mount on a 7/8" Leeson motor shaft, but the prices are set by each dealer so can vary widely. They also sell an excellent 15" impeller but it only works with the 1 1/8" motor shafts. Based on my engineering Penn State sells a custom made 3.5 hp motor that turns a 14" impeller, but unfortunately they chose to use an aluminium impeller which the National Fire Protection Association no longer recommends because these throw off 4th of July sparkler like sparks if hit by a knot or piece of metal. - Miscellaneous
You will need some solid-core 3/4" plywood or MDF to cut your 18" diameter cyclone top ring with 9" hole.
Also you need some scrap wood to make some jigs, fixtures, and some wooden rings to help hold all together while you build your cyclone. This includes wood to make 6" and 9" rings to ensure the cyclone inlet transition, the blower outlet transition, and the cyclone outlet chute are each sized correctly and made round. If you do not buy an assembled kit, you need ample clamps to help form and hold the round metal pieces. I prefer to use stainless steel worm drive 1/2" wide band clamps. Buying the same brand clamps lets you screw smaller clamps together to make larger clamps. I recommend buying three or six 6" clamps and two 3" clamps. These are available for a few dollars each in the HVAC sections of larger hardware centers. A 6" clamp screwed to a 3" clamp creates the 9" clamp you need for the cyclone air outlet cylinder. Three 6" clamps creates the 18" clamp needed for the outer cylinder and upper cone. The 6" clamps let you make the transition and dust chute cylinders. Making your own cyclone also requires you to precisely cut an 18" diameter disc, a pair of 9" diameter discs, and a 6" diameter disc used to size and ensure the cyclone round parts stay round during construction by clamping the metal tightly to these discs with the worm drive clamps. These discs are required to be kept in place during construction to also ensure adding the cyclone inlet does not cause the upper cylinder to warp and lose its ability to fit to the top ring. I use two 18" rings on that upper outer cylinder.
You need either wall or ceiling mounting hardware and vibration dampeners. Standard Stanley heavy-duty shelf supports from your hardware store work well for wall mounting the blower (13" x 20") part number 25-7555/795 scan code 33923 06819 2. You can also make a simple wall mount wooden frame that will support your cyclone and blower well. I should soon have detailed plans up on my Build Cyclone page that shares how to build this wall mounting frame. In either case you will need to provide the screws, bolts and miscellaneous hardware to mount your cyclone. You also should buy or make from a rubber hose vibration dampeners to mount the motor plate.
I recommend that you fill any imperfections in the wooden parts with wood putty then prime and paint all the wooden parts. Most plywood only takes about one can of undercoating and another can of spray paint for the wooden parts. Double this if you use MDF.
I also recommend you fill, prime and paint the cyclone and dust bin to match. Automotive spot body putty does wonders to fix minor imperfections and smooth joints before painting. Most need one small can of auto body filler, a large tube of spot or glazing putty, two cans of paint primer, and three cans of spray paint for the cyclone and collection bin.
Cyclones make a lot of noise, but this noise can be tamed. Never mount your cyclone directly to a wall or ceiling because that will transmit the sound throughout your shop and home if attached. Ideally you want to mount your cyclone outside your shop in its own enclosed area. If you put it inside it is best to use a sound insulated enclosure preferably with the sound insulating sheetrock where a single layer provides eight times the insulation as standard sheetrock. My web pages share how to make an inexpensive muffler which will reduce the overall noise by roughly half. Many find that if they have the inside of the cyclone and blower sprayed with pickup truck bed liner or rubberized automotive undercoating (not tar or asphalt based), that they have much quieter systems. This also helps avoid wear where the air first impacts the inside of the cyclone.
- Availability
Cyclone and blower kits get cut weekly, so typically get cut and shipped within two weeeks. I've paused on taking orders for any more formed parts until we get caught up with the backlog.
Unfortunately, the response remains overwhelming with a few startup challenges. I ordered up enough cut cyclone and blower pieces to cover at least six weeks of expected sales. He sold out in ten days. Thinking the business would restart slowly to make a little extra my son agreed to sell a few partially and fully assembled kits. He received more orders for partially and fully built cyclones than the two of us can build working full time for six weeks. I said no more building until he had the built parts ready to ship. My CNC cutter delivered 14" blower housings instead of the 15" ordered then went out of business leaving a vacant office and for rent sign. That left extra 14" blower housings. Until we find a new CNC cutter and my son can afford the high cost for initial programming, all the MDF parts must be hand cut. That left me to make a set of templates. He uses a bearing bit to follow these templates so his parts look better than the multiple pass CNC cuts, but make a monster dust cloud and take too much time to make. We had a few other challenges like running our laser cutter out of sheet metal and our old blower transition not fitting my newer blower design so we also had to hand make transitions. He also way overdid worrying about far too much work, so also got sick. I stepped in to both help and hire an independent contractor with all the right sheet metal tools to quickly catch up on the building. The good news is he can now fill all orders except the built units within about two weeks. - Delivery
When your check clears or PayPal notifies that your payment arrived your order gets scheduled and your order gets scheduled for shipping. He does not maintain a large parts inventory, so if too many orders come in all must await his suppliers. You will be notified if your order will take more than two weeks to ship.
- Shipping
These cyclone kits contain large metal parts that require large oversize boxes making for expensive shipping. To keep costs affordable inexpensive ground shipping gets used. This permits affordable shipping through to the contiguous 48 U.S. states with a typical 7 to 10 working day delivery time. Shipping to Alaska and Hawaii costs more and takes more time, so shipping outside the continental U.S. will be quoted for each individual order.
Additionally there are duties that must be charged and paid in advance to ship to Canada and other countries. You are responsible for finding out the brokerage fees, customs, import duties, value added taxes, etc. for your country. We do not find out this information for you nor do we take responsibility for paying these additional costs. That is your responsibility. Between these taxes and shipping charges most choose not to get items shipped from the U.S. to Canada, Europe, the Middle East, Asia, Japan, Australia or other countries. - Shipping Damage
All gets well packed and shipping is insured, but we cannot control shippers, or take on the responsibility of dealing with damages they cause. All shippers occasionally ding the metal in spite of the best packing efforts. Even my heavy commercial cyclone that came carefully packed in a molded 2" Styrofoam protector arrived so damaged it required replacement. Most problems can be fixed with a little hammer work against a hard surface. More serious problems require your working with the shipper and their insurer.
- Orders and Payment
Orders ship in the same sequence as the orders arrive. Although he prefers to receive payment via cashier's check or money order, he accepts PayPal payment. PayPal will let you pay via cash, bank transfer, or credit card. He does not accept credit cards. No item gets shipped until the payment clears. All prices and payments must be in US dollars ($). If you would like to get one of the cyclone kits please first verify delivery times then you can order a kit by email, and make your payment to:

or by sending a money order, cashier's check, or check (requires 10 working days to clear) to:
Michael D. Pentz
1909 Studebaker Place
Gold River, CA 95670
- Support
Although all of these designs are mine I own no part of this kit business and am a reluctant retiree who got volunteered to help while my son gets finished up with school and gets this business going. I provide my help at no charge and my son works at near minimum wage so we can help you out with affordable cyclone and blower kits. I would greatly appreciate your not expecting me to do much hand holding as you build your own system. More than 10,000 people now use my cyclone and most built their cyclones without kits just using the instructions from my web pages. If you are not willing to take the time to read over and follow my web page building instructions or you expect help making an undersized dust collector power one of these cyclones amply to get good fine dust collection, then these kits are not appropriate for you. Please share any problems with my instructions, suggestions for improvement to improve these pages and kits, your successes, and honest feedback.
Best regards,
Bill Pentz
Click to send me emailThese web pages regularly get changed and most browsers do not automatically get the most current version unless you do a page refresh, so please refresh each page that you come back to visit. Links to other Internet information are underlined and provided in blue you can click on these links for additional information. Please start by reading over the Introduction then the Dust Collection Basics followed by the Medical Risks and Doctor's Orders pages. Please email me (BPentz@cnets.net) if you find problems or confusion.