

Home
Dust Collection Basics
Equipment
Ducting & Hoods
Wood Toxicity Table
Testing
FAQs
Projects
Administrative
Financial Help
Contact & Email

Downdraft Table
-
Foreword
After far too many demanded I provide a good plan for a downdraft table, here are the plans for what I use and what it takes to build a good downdraft table. You need to first read and understand my pages for this information to make good sense. That page lays out the dust collection basics learned from decades of experience and shared by those major firms who guarantee customer air quality. These firms learned long ago that good fine dust collection only works if we collect the fine invisible dust as it is made and then get rid of that dust. They found that woodworking makes so much fine dust and this dust lasts so long that even a little dust escaping quickly builds to dangerously unhealthy levels in even the cleanest looking shops. Also, please understand this is my hobby and the building instructions I share work for me, but not in all instances. It is up to each of us to ensure our dust controls work. Additionally, some of my designs can create deadly results if you use poor parts, poor construction or otherwise fail to ensure the safety of your creations. If you don't have the skills and are not willing to take the time to build something functional and safe, then don't build it! Go buy one.
-
Introduction
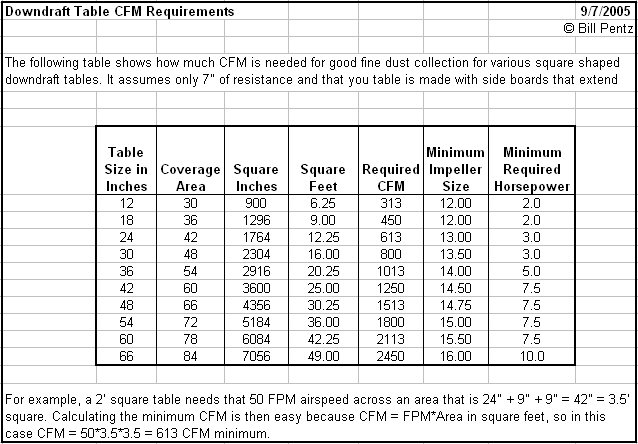
Woodworking downdraft tables compromise and let much of the most dangerous fine dust escape collection. Most downdraft tables lack the size, airflow, and protections needed to consistently collect the chips, sawdust, and fine dust. If we engineer our downdraft table with the roughly 4000 feet per minute (FPM) airspeed needed to pull in our chips and larger pieces of sawdust, then a big 5 hp motor turning a 15" diameter blower impeller still only supports good chip collection for a table size of only 10" in diameter. A good downdraft table needs to be larger so most downdraft tables must rely on side boards and gravity with a sloped bottom to collect the heavier sawdust and chips. Good fine dust collection requires a minimum airspeed of at least 50 FPM in all directions to successfully capture most of the fine dust. Our same 5 hp blower will only collect the fine dust over roughly that same 10" diameter table. This means just like for chips good fine dust collection requires downdraft side boards and even a top. This means almost any downdraft table we build to help larger than about 10" in diameter badly compromises for both chip collection and good fine dust collection.
Clearly, downdraft tables lack the airflow to provide good long term fine dust protection as they miss too much fine dust. This means we should always wear a good NIOSH approved dual cartridge filtered respirator whenever using a downdraft table. Downdraft tables miss enough fine invisible dust that their use builds dangerously unhealthy dust levels and just about any airflow launches this previously made dust. This means when using a downdraft table we need a strong exhaust fan or we need to keep wearing our respirator mask until we clean out our shops. Sadly, most air cleaners which we buy to help this situation only remove the visible dust so they leave clean looking surfaces while the fine invisible unhealthiest dust builds to dangerous levels. I recommend you build or buy a portable hood to connected to your dust collection system and put right next to the work as you use your downdraft table. Even with these enhancements, considerable fine dust will escape collection. So, to stay safe whenever we use a downdraft table we also must regularly blow out our shops and clean them thoroughly with a HEPA filtered vacuum.
Still downdraft tables greatly reduce the amounts of dust allowed to become airborne, so they remain a must in most shops for good fine dust control. -
Good Downdraft Table
A good downdraft table must provide the same things found in a good dust collection system.
Fine dust spreads so fast that once it escapes collection exhaust fans and air cleaners fail to remove the airborne dust fast enough to avoid failing an air quality inspection. Air engineers found good fine dust collection requires that we collect the fine dust at the source.
Good fine dust collection requires hoods and barriers around our woodworking operations to keep the fine dust from escaping. Most blades bits and cutters launch air streams full of dust at 100 miles an hour and faster. Even our biggest dust collector and cyclone blowers rarely move air over 40 miles an hour. Unless our hoods block and contain the fast moving air streams our shops will rapidly build dangerously high airborne dust levels that get stirred airborne repeatedly.
We must move enough air to pull the dust away from our tools. Airflow consists of air speed and air volume. Airspeed defines how heavy of a particle gets moved and air volume defines the effective collection area size. As we know from using our shop vacuums we only collect right next to the nozzle and must constantly move the nozzle close to what we wish to collect. Unlike blown air sucked air comes from all directions at once so air speed falls off at roughly 4 times pi times the distance squared. Although we need at least 3800 FPM air speed to pickup sawdust and chips, most air engineers design systems with a little safety factor increasing that airspeed to 4000 FPM.
And we must get rid of the fine dust. I always recommend venting outside simply because most small shop vendors sell fine filter bags and cartridges that filter off the visible dust and freely pass the invisible dust right through. When vented inside these units quickly build dangerously unhealthy amounts of fine dust in even the cleanest looking shops. Until we get to really cold temperatures a couple of IR heat dishes will keep most shops comfortable when venting outside. A doctor friend in northern Canada says he vents outside down to about 20 below, but he uses four IR heaters. When you vent outside you must also provide a source of makeup air so you do not pull deadly carbon monoxide backward through your chimneys and vents.
-
Down Draft Table Sizing
-
Woodstock Portable Downdraft Table
My wife bought me a Woodstock portable plastic 24" square downdraft table. That portable downdraft table provided convenience but worked poorly. It consists of a thick vacuum-formed plastic base with a 4" flex hose adapter molded in topped by a heavy punched steel anodized metal grate. The grate is made up of 5/16" square punched holes separated by 3/16" ribs. The punched metal has sharp edges that destroy any project, so I bought an expensive non-slip perforated sanding mat. The sanding mat worked well until my daughter cut it up for a "project". Fortunately, my wife found some identical material in the form of non-slip foam cabinet liners from Wal-Mart that cost $2. Those liners look identical and work just as well as my $30 non-slip sanding pad. The gravely undersized 4" port on this table severely limits total airflow. That tiny port limited my 1200 CFM cyclone to only about 350 CFM yet this table size needs closer to 2500 CFM for good airflow. When I modified the table port to 6" the airflow still stayed below 800 CFM due to other base constrictions. This poor airflow says this table needs side boards and a top to control the dust that flies away from the table. This poor airflow combines with a poorly molded plastic base to cause considerable dust to build under the grate. Its square grate holes proved too small for collecting chips. It needs at least 3/8" holes. Still, its size provides convenience and I often use mine rather than clear off my larger downdraft table.
To keep the table from disconnecting from the dust hose all the time and not wanting to go to the work to put on a clamp, I drilled a hole through my hose adapter and the table then drop a nail through that hole to hold the duct in place.
This table does have its limits. It works fairly well with my PC pad sander that is known for not stirring up the dust. However, when I use more aggressive sanders this unit struggles and misses lots of dust. It really needs lift up side and back panels that would go up at least 6" to be more effective with more aggressive sanders. Using this table has also shown me that a 2' square table needs at least a 6" port and at least my 5 hp blower to provide good dust collection! My 1.5 hp dust collector works terribly with this big table which actually is too small for many operations.
Before I upgraded my shop to all 6" ducting this table worked poorly at best. After upgrading, the performance of this table went from marginal to much better, but frankly I would need 8" or even 10" ducting and twice the sized blower plus side boards and a back to make this table work effectively. It still works better than nothing. -
Home Built Downdraft Table
 I built a new downdraft table as a top that slips on one of my rolling in and out feed tables. The design is simple. I started that table using a squirrel cage fan. I hated cleaning its 1 micron 3M furnace filters. Plus, it worked poorly with way too little airflow. I tossed the squirrel cage and filters, then went back to my 4" dust collector outlet. My first top for that table was made with half-lap spruce all glued up pretty. It worked fine, but wore badly, especially with daughter and son sanding on it as much as on their projects. It got replaced by a piece of the heavy Masonite pegboard with my drilling out the holes from 1/4" to 3/8". I made the Masonite a little proud, put a 1/8" chamfer on the edge, and use a tapered drill for the holes with a slight countersink to keep from scratching my work (a lesson I learned the hard way). I glued on strips to make it the same height as the prior spruce top. I eventually added three 10" side skirts that can be lifted up to better trap the dust. I copied a nice design using a "J" shaped slot and a smooth bolt. The wood is simply lifted on the "J" around the bend then holds in place on the lower tip of the "J".
I easily formed a nice looking and very functional downdraft table bottom with dust chute from heavy plastic. Start with a piece of 3/16" Rovel plastic (check out a local plastic store and ask for heat formable plastic). Size that sheet to fit tightly inside the downdraft table frame opening. Cut a 4" hole in the center. Secure that plastic inside the frame 1" down with a good air-tight seal. I used quarter round inside the frame placed 1" from the top, put down the plastic, caulked it in place with polyurethane sealant, then secured it tightly with another piece of quarter round on top held with brads. The brads go right through both pieces of quarter round and the plastic to make a strong joint and tight seal.
Now form the outlet. Take a piece of 6" PVC pipe and cut a slot whose width is Pi * 2 * width of the Rovel plastic. Use a band clamp to make that pipe close down tightly. This pipe will be used to form the Rovel plastic into a 6" male outlet. By using a heat gun soften about 2" around that 4" hole then press the pipe and Rovel plastic into a standard 6" PVC fitting. The result is a roughly 1 1/2" long male connector that exactly matches the pipe size needed for a tight perfect fit into our PVC pipe fittings.
Use polyurethane caulk to glue that male end into a PVC fitting. When the glue dries, insert the sizing pipe back into the hole and then carefully heat evenly that whole piece of plastic. I put a 10 pound weight on my sizing pipe to gently pull it down making for a nice smooth slope in the plastic from every direction.
Remove the sizing pipe and hook up either to a blower directly mounted below the table or to your central dust collection system. I added a pipe that goes out the side of that roll-around table that is wrapped with a spiral of wire similar to the spiral on my flex hose. This lets me screw the flex hose onto the pipe for an airtight fitting without having to mess with clamps. -
Wrap Up
I am seriously considering making one more downdraft table with my router in the center. If there ever was a tool that could use the downdraft, it would be my router.
On 1/23/04 Jim Dobbs reminded me to, "Be careful to not pull air from the top of a router. This is opposite to the direction that the router fan pushes air through the router. By pulling air from the top, you will stall the cooling air flow and burn up the router. I always put my vacuum collection in line with the cutter (edge routing) or just below the table (face routing). I learned this from experience on my first router". - Frequently Asked Questions (FAQs)
I've just finished building your cyclone and am left with a 2 hp Grizzly 1029 dust collector. I was thinking about building the blower from that unit into a portable downdraft table. Would this work and how do I go about computing how big I can make that table? Any suggestions or advice?
The bottom line is your Grizzly blower is too small to make a good fine dust collector or power a good down draft table, so you should instead power your down draft table from your cyclone. I made my down draft table to connect to my cyclone so it gets a real over 1200 CFM. I also made mine to roll around and at the same height as my table saw. By locking the rollers in place, that gives me additional room to slide stuff on and off my saw.
If you do the math or look at the commercial tables from those vendors who guarantee good fine dust collection they all show right at 1000 CFM is required to get good fine dust collection at most small shop stationary tools. The same math applies and your Grizzly and it will not move enough air for good fine dust collection at most stationary tools. It is only going to move 545 CFM with a standard 5" duct and tests at 600 CFM when you add a larger 6" duct and we need 1000 CFM. Some of the Grizzly 1029's had a removable 5" face cover that some upgrade to a 6" (Depends upon year of your collector). This is not a smart upgrade because the Grizzly does not move enough air. If you use ducting then you are limited to 5" duct or will get plugging in your vertical runs.
You can make a down draft table with the Grizzly, but be aware it is not going to be a very large table or do a good job collecting either the regular or fine dust. Just like using this unit as a dust collector, when used to power a down draft table you will miss collecting lots of the fine dust so still need to work wearing a good respirator with a strong fan keeping your shop well ventilated.
In terms of a downdraft table I'd directly mount the Grizzly to your downdraft table. If you do that, you do not need to use ducting. Using ducting is not nearly as efficient. In terms of design for the downdraft here are the steps to figure out how big you can make yours.The size of the table itself must stay small enough that it keeps up enough airspeed to pull in the fine particles and also the large particles.
From my Equipment Page, Blower FAQs you can see the basic need is a minimum of about 1000 FPM to get the fine particles. Air engineers design for volume and duct speed, as the particle size gets smaller. Very Fine dusts have very little inertia and are captured well with lower velocities, but you still have to move enough volume to make sure those fine particles get drawn back into the hood before normal room air currents blow the particles away. For example, gases and very light powder dust velocities would be 50-200 FPM; light powder dust at 200-1000 FPM; and powder dust at 1000-2000 FPM. Notice this is in feet per minute (FPM). The research is very clear that to get good fine dust collection we have to have at least 50 FPM air speed out to a distance of about 15.25" in every direction, meaning a sphere around the working areas of our tools. Because a vacuum draws from all directions, FPM decreases at the same rate that sphere of air increases in area. From the formula for the area of a sphere at 4*PI*r*r we see what a huge difference a little distance makes in airflow velocity. A blower with a 6" intake that produces 800 CFM at 4000 FPM generates only 318 FPM at 1', 80 FPM at 2', and 35 FPM at 3' which is too little to take in the fine dust particles.
Assuming your Grizzly will pull about 4" of resistance between the connection, resistance of the holes in the downdraft table, and filters, it should provide about 600 CFM through a 6" connection. A 6" hose has an area of 3*3*Pi = 28.27 sq. in. Divide that by 144 and we get 0.19635 sq. ft. Knowing that FPM = CFM / Duct Size in sq. ft. FPM = 600 / 0.19635 = 3056 FPM. With a target of 4000 CFM to ensure no duct plugging, the 6" pipe is too large for that Grizzly and most other 2 hp 12" diameter impeller blowers. What will happen is any vertical runs are going to have issues because there is not enough air speed going up vertical runs to carry the debris which leads to plugging. Alternatively, a 5" diameter hose has an area of 2.5*25*Pi=0.136354. The 5" duct itself is going to limit the airflow down from that 600 CFM that a 6" duct will provide to only about 545 CFM leaving FPM = 545 / 0.136354 = 3997 FPM which is close enough to the 4000 FPM which is optimum for pulling woodworking debris us vertical runs. If we only need 1000 FPM to move that fine dust, then we can work this backward to compute the total area for the holes in the downdraft table.
From FPM = CFM / Duct size we can use a little algebra to compute Duct Size = CFM / FPM. Starting with 545 CFM from your existing blower and wanting 1000 FPM we come up with a duct size of 0.545 sq. ft., roughly three times as much area as our initial hose. Whew! With all that we come up with a downdraft table that is about a half square foot large.
In fact, what we really did was compute the total area of the allowable holes in that table to ensure it gets the fine dust. If we used the thick Masonite with standard 1" spaced 1/8" diameter pegboard holes for our top, we must enlarge each hole to 1/4" (1/4" to 3/8" seems to work best). That gives each hole an area of 0.049 sq. in. per hole. The 0.545 square feet we computed as the area we had to work with turns into 0.545 * 144 = 78.48 sq. in. Divide that by 0.049 and we end up with a table that will have 78.48 / 0.04 = 1601 holes.With pegboard having a hole every 1", the square root of that, 40" would give us a fair idea of a square table size that handles small particles.
At the same time, we also need to get the large particles For that we need 3000 FPM to make them move in the horizontal minimum (from the AAF tables). Divide 545 CFM / 3000 FPM and we get 0.181 sq. ft. Multiply by 144 and that gives us 26.1 sq. in. Divide that by the same hole size of 0.049 and we end up with ~ 533 holes. The square root gives us a 23" square table.
In fact, the correct solution is going to be the smaller of the two. I made mine 2' square more by intuition than all the math, but strangely it came out pretty close. If you choke it down with 4" duct the size falls to about 16" maximum. If you use bigger holes, then the table quickly gets smaller.
Make sure you provide sideboards on the table that can be raised by at least 6", preferably on all four sides. Use of J shaped holes with two wood screws makes a nice setup that will let you lower and raise those sides as convenient.
With pegboard for the top you would be well off to use a little sandpaper to lightly taper the top of each hole so the holes do not hold your work (See attached Downdraft.gif) I put my hose in the center with four tapered boards made of 1/8" Melamine material glued with RooGlue, but anything would do. Leaving a lip that lets the pegboard sit just proud of the table helps lots. I leave about 1" clearance on the sides between the bottom of the pegboard and tops of the tapers with a standard 1x4 for the sides, so the taper is not a lot, but enough. Also a few blocks glued to 1/4" dowel stock makes for nice stops on the pegboard. I also use a piece of that Rubbermaid foam shelf liner that grips like a router pad, but has nice holes to let the dust through (see DowndraftPort.gif). You can mount the blower below in a roll around or go to it with hose. Also, the hole does not need to be in the center. I've designed a few with the hold on the end with the tapers going to it.
I've read this information over and over, but still do not understand why we have to move so much air to collect the fine dust that we can easily move the the lightest breath?
This is one of those questions that you already know the answer to, but are confused between blowing and sucking. I'm sure you have used a shop vacuum. On blow it will blow stuff all over your shop from quite a distance. On suck, how close do you have to get the vacuum nozzle to the sawdust you want to pick up?
The issue is sucked air comes from all directions at once so its speed falls at four times Pi times the distance squared. To get the minimum 50 feet per minute airspeed we must have to keep normal room air currents from blowing the fine dust away, we have to move a lot of air.