Measurement
- Acknowledgements
- Caution
- Introduction
- Testing Setup
- Testing Procedures
- Appendix A - Further References
- Disclaimer
- Acknowledgements
Jim Halbert in the mid-1990s freely shared his knowledge on airflow, cyclone design, and measurement in articles and innumerable forum posts. I spent almost no time looking at Jim's efforts in spite of spending a huge amount of my limited woodworking time all tied up with trying to get my own dust collection system working well. I admired and felt sorry for Jim because many of his posts got attacked and mired in controversy. He consistently told people they believed garbage advertising hype and needed to do some of their own measurement.
I had moved my woodworking from my parent’s cabinet shop and our university shops to my home-based shop where I had a big dedicated building with a raised floor that let me put all my ducting below. I then moved to a home with no shop, only a home-attached garage where I could force fit my already too large tool collection into one bay with all on rollers. My dual roll-around 2 hp Cincinnati Fan dust collectors worked fine at picking up the same stuff I would sweep up with a broom, but the airborne dust levels in my garage-based shop got so high it was impossible to breathe. I upgraded to very fine bag filters on those units and that only helped a little with the airborne dust, but those fine filters constantly clogged and needed cleaned to even provide my prior level of collection. I then installed a big ceiling mounted air cleaner and it worked far too slow to give any relief while working. That left me having to work in my NIOSH approved respirator mask with the main door open and a big fan blowing outside air through my shop and out a side door. With promises this would cure my airborne dust problems, in 1994 I upgraded to a Shop Notes cyclone and it did not work nearly as well as my dust collectors failing to collect the larger debris and it put even more fine dust into the air. I then upgraded to a kit cyclone and it worked no better, so I got serious about fixing the flaws in my cyclones. I did a ton of work which I shared on the Internet and soon all the major small shop vendors were using some to all of my new cyclone design. I burned out on spending my little woodworking time messing with cyclones and dust collection, thought I was doing as I did for my parent’s shop where there I put in a top-of-the-line Donaldson Torit dust collector that all but eliminated the airborne dust when working. I installed the top magazine rated cyclone system with vendor supplied ducting and fine filter using the vendor’s custom ducting design for my shop. This system was rated to provide good fine dust collection with three or four of my larger tools all working at the same time. It came with a very impressive looking graduated ducting design that went from a large main going into the cyclone separator to every finer branches then down drops to each tool going down to 1" for my handheld and smaller tools. This system made me very angry because after all my cost and time to install it, and having to fight my way through their innumerable ducting errors and missing parts, it worked far worse than my prior cyclone and dust collectors it replaced. I vowed to throw it away and put in a Donaldson Torit professional system as soon as my Christmas rush projects were finished.
Instead, suddenly I landed in the hospital with respiratory problems and my doctors said no more woodworking until I cleaned up my very clean looking shop. With lots of research including the university where I have taught engineering for over three decades, I kept finding much of the best information on small shop dust collection came from Jim Halbert. By then he had long given up posting, so I did lots of digging through the various woodworking forum archives and finally contacted him directly. He liked the changes I made to my cyclone and had made many of those changes in his own system, plus he had another he recommended to me that increased performance significantly. We traded lots of emails where he shared his dust collection information, design and testing articles and web pages.
Jim Halbert started with and supported Rick Peters' book, Controlling Dust in the Workshop which is a great resource for learning about "chip collection". Rick makes it clear many dust collector vendors have serious problems with their advertising claims not coming close to working levels for airflow, horsepower, and filtering. Likewise, Rick cleared up a lot of standard practice that is poor basic dust collection design. Jim then went on to build, measure, and document much of what we now need to know about dust collection and small shop cyclones.
I found myself going on from where Jim Halbert left off and focusing on how to provide and measure the effectiveness of our fine dust collection efforts. To fix my dust collection system I carefully evaluated what was available and found it lacking. Rather than sit around and complain, I got busy doing the homework and research to design and build a totally new and much more efficient cyclone, a budget blower, a muffler, a filter tree for my cartridge filters, new hoods, a downdraft table, and to really work through the available ducting options. I chose to share my efforts on these web pages. Jim proved to not be gone. He approved and sent even more information and articles along with his permission to use, update and share his efforts to help fellow woodworkers. Testing is one of those key areas that he helped to refine and document. Wishing a big thank you to Jim, Rick Peters, and to all of the other hundreds who have helped me create this resource! - Caution
Woodworkers should start by reading my Introduction page followed by my Dust Collection Basics page to learn about the equipment, air volume (CFM), air velocity (FPM), and important terms before starting on this measurement page. If you already are an HVAC air measurement expert you might just want to look over the testing procedures to see the differences between small shop dust collection measurement and HVAC measurement. You might also want to look over the references provided in Appendix A.
- Introduction
This site shares with other woodworkers more of what I learned about the hazards of wood dust and the protections I implemented. This particular web page goes into the detail of how do to airflow measurement with practical reasons for doing this measurement.
After investing a few thousand dollars on my dust collection system and ducting for a large three car garage sized shop, I wanted to measure the results to know that it provided ample protection. It was well worth spending $75 on test equipment to measure my system's performance, find leaks, and keep my system tuned to efficiently to capture that fine, most dangerous dust. The following relatively easy and inexpensive tests helped me evaluate the performance of my DC system and find any leaks.
The "official" air testing procedure is defined by the American Society of Heating, Refrigeration, & Air-conditioning Engineers (ASHRAE). ASHRAE is the independent non-profit group of engineers who set air measurement standards within the U.S. Dwyer Instruments recommends and provides the equipment to follow this industry testing standard for measuring static pressure (SP), air velocity (FPM), and air volume (CFM) at different resistance levels. These standard testing procedures show we get very different results between a steady airflow and a turbulent airflow so we must use a standard test pipe to minimize turbulence. To minimize turbulence our test pipe must be the correct length and diameter, have our probes properly located, and have a ring sealed on the end. Air tests measure maximum pressure when all is closed then measure airflow at less and less resistance until all is wide open where we have our maximum airflow. To adjust airflow our test pipe must have an air valve on the ring where we can adjust from no airflow to maximum airflow. Our testing also is done with an amp meter attached to our motors so we do not try to move so much air our motors move more than their maximum rated amperage which will burn up motors. - Testing Setup
- Pressure Measurement Tools
The various test gauges come in different sensitivities. Most small shop dust collector systems generate under 13" of maximum vacuum with the largest 5 hp units under 17". Even the big 10 hp unit I measured only generated 22" of maximum vacuum. Likewise, our same small shop systems typically run with a static pressure (SP) range of between 2" to 14" water column inches.
- Manometer
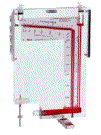
 A manometer is the simplest of the pressure gauges and is a critical gauge for small shops to use to detect leaks and measure overall maximum vacuum that a blower can produce. We start with a manometer to make sure we don't have so much pressure that it could damage our other more expensive gauges. Most manometers are simple looped tubes filled with colored water next to a ruler that measures total pressure in inches of water often referred to as water column or W.C. for short. Some manometers come as nice plastic machined instruments as pictured on the left, and others like my slack tube manometer pictured on the right are just a looped tube attached to a ruler. You can buy a simple one for a few dollars or get a top-of-the-line digital unit. Some make their own, but their inaccuracy and the low cost of a commercial one makes building your own a waste of time. All commercial manometers work equally well for measuring maximum static pressure (Max SP) if scaled roughly between -10" to 10" water column. With the bigger systems I test a -15" to 15" is ample. A manometer will measure the differential pressures we need to get CFM, but often lacks the needed accuracy for fine measurements.
- Magnehelic® Gauge
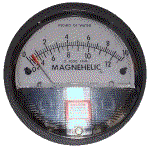 The Dwyer Instruments Magnehelic® gauge provides the industry standard differential pressure gauge. Like the manometer, it can measure Max SP but only up to its maximum pressure range. Going over that can peg the needle and ruin the gauge. Never use too small of a Magnehelic® gauge to measure Max SP! Unlike the manometer, when connected to the two inputs on a compatible Dwyer Instruments model 166-6 or 167-6 pitot tube it also measures the pressure of moving air sometimes called velocity pressure. We use this velocity pressure to calculate FPM which we can use to also CFM. The Dwyer AV series Magnehelic® gauge shown provides a second lower scale that shows airspeed in FPM.
- Digital Gauges
Digital Gauges are expensive, but are often easier to use, read and give more accurate readings, plus can work over a wider range.
- Digital Manometer
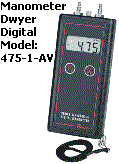 A digital manometer with a range of -20" to 20" W.C. or better can replace both the slack tube manometer and our Magnehelic® gauge. This gauge when coupled with a matching Dwyer Instruments 166-6 or 167-6 calibrated pitot tube can read Max SP plus both static pressure and velocity pressure needed to calculate FPM which we can then use with ducting size to calculate CFM. I use a Dwyer digital manometer and like its accuracy. The digital manometers provide readings that are far more accurate than analog gauges. These digital Gauges are expensive costing over $480 in 2021 which is four times more than the analog gauges. I personally use a Dwyer Instruments digital kit which contains the digital manometer with the longer reach 166-6 pitot which we need for measuring up to 12" diameter ducting. The kit also includes connection tubing, step drill, case, and two probes which in 2021 cost $483 direct from Dwyer Instruments. I also have the next model up Dwyer Instruments digital manometer that gives a reading of airspeed and costs more. Digital manometers rarely sell on eBay, but when they come available typically sell for 80% of new cost. I bought one used that someone had used to measure dirty air and plugged up the internals. Its purchase price plus having Dwyer repair and recalibrate cost more than new.
- Anemometer
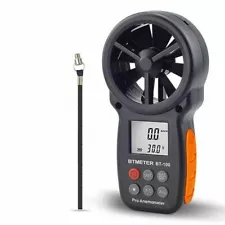 An anemometer measures air velocity. For dust collection we want to measure in feet per minute (FPM). Although these are nice instruments that can measure air speed, most anemometers with easily turned wheels are scaled to read low maximum air velocities found in HVAC systems or mild wind velocities measured in miles per hour. Those able to measure the much faster air dust collection air speeds in FPM are more expensive. For dust collection systems we should have one that can measure up at least 5,000 FPM and 10,000 FPM is even better. Be careful to buy an anemometer able to handle high air speeds. Dust collection air velocities can spin the fan type anemometers so fast the bearings fail and the whole unit will soon self-destruct. My first three of these inexpensive fan based aneometers failed after just a few uses. They were not tough enough for dust collection pressures and air speeds. Although simpler and far less expensive, the inexpensive anemometer gauges are not that accurate and block so much of the air they significantly affect our measurement. Traditional gauges are not that much more expensive and provide readings that with a little math can give you much more accurate measurements.
- Digital Anemometer
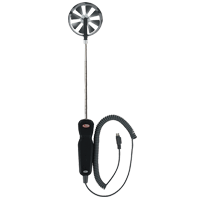 Early digital anemometers were initially simple and inexpensive, but not very accurate. They also blocked so much of the air they significantly affect our measurements. Digital anemometers are more accurate and much more reliable. Different kinds of sensors are used on the digital anemometers. There are those like the one pictured on the right that has built in sensors to measure differential pressure similar to a pitot tube and those that use a hot wire or something similar that the speed of air flowing over its tip will vary the temperature to computer air velocity. I have even seen one that pushes on target attached to a sensor where the amount of push or pressure is converted into air speed. Generally, the more that gets put in front of the flowing air, the less the accuracy and more that our measurement gives unreliable results.
- Thermo-Anemometer
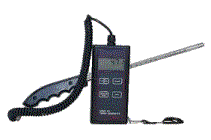 A thermo-anemometer measures air temperature and velocity in FPM. Unlike the less expensive anemometers that spin a wheel or disc, the thermo-anemometers put a minimum in the way. By minimizing how much air is blocked, we get much more accurate results. The one pictured to the left measures probe tip cooling allowing the gauge to calculate with good accuracy actual air speed. It is also very tough and will not be hurt even if the air speeds grow very fast. Although I should buy and try a thermo-aneometers as they look like they could be better than my pitot tube and digital differential pressure gauges, I have not as my digital gauges provide a high degree of accuracy and cost quite a bit of money when new, so I do not see any need to replace them.
- Digital Manometer
- Manometer
- Test Probes and Pitot
- Pressure Gauge
We can buy dust collection pressure gauges that fit into a hole on the surface of a duct. they have a foam protector that will let us measure pressure for clean or dirty air. They measure the pressure inside the duct. These are mostly used to know when it is time to clean and when to replace our fine filters. They are not accurate enough to attach to our test duct for measuring Max SP. I instead use a simple probe that lets me measure pressure in both moving and still air. I
- Simple Air Probe
 A simple air test probe inserted into a piece of test duct provides a way to measure the pressure of both non-moving air pressure which we need for our Max static pressure (SP) test and for measuring the pressure in moving air needed for our SP tests. It connects to our manometer via a plastic tube. It does not measure velocity pressure. To measure velocity, you need a calibrated pitot tube.
- Pitot Tube

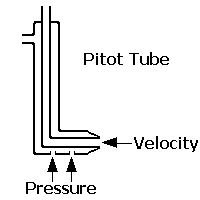 In moving air to accurately measure SP, vacuum, air speed and CFM you need a pitot tube. A pitot tube is a very carefully calibrated "L" shaped tube within a tube. There are holes in the side of the outer tube and an opening at the tip of the inner tube. The pointed inner tube end of the pitot tube in the diagram points directly into the "wind" inside the duct and picks up the positive pressure of the incoming air on the pitot tip. The openings on the outside tube at the bottom of the "L" pick up the vacuum pressure in the duct. Making an accurate pitot tube requires special tools leaving little option but to buy one calibrated for the test instrument we use. Most of us end up using the Dwyer Instruments 167-6 or 166-6 calibrated pitot tubes, but a number of other vendors offer alternatives. I recommend only doing testing of clean air because clogging your pitot can be expensive as they are difficult if not impossible to clean. You can buy from Dwyer and other vendors special pitot tubes for dirty air. The Dwyer type 'S' pitot tubes are for dirty air, but I found they still plug. The -6 in the Dwyer pitot tube name means it is designed to measure up to 6" deep inside our duct meaning we can measure air in up to a 12-inch diameter duct as we only need to measure to the center. We mostly just put the pitot to measure the air speed at the center of the duct, but more accurate testing requires testing at a variety of depths and averaging the results. The inner and outer pressures combine to create what we call differential pressure which with a little math gives us an accurate measure of air speed and air volume within our duct.
- Simple Air Probe
- Pressure Gauge
- Pressure Testing Preparation
- Testing Scope
We can perform our measurements with a number of analog or digital gauges. Rather than try to describe every testing method, the following testing focuses on use of just the most affordable industry standard testing instruments. Fortunately, just about every other test instrument uses very similar testing processes. The standard uses a Dwyer Instruments slack tube manometer to test Max SP so we don't hurt our more sensitive gauges. It follows up with use of a Dwyer Instruments Magnehelic® analog differential pressure Gauge to measure SP and FPM at each level of resistance. Even these analog gauges are delicate, so be careful.
- Prepare Test Sheet
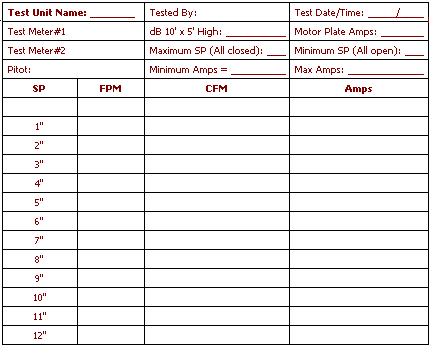
I normally start off when testing a new system by filling out a copy of the following test sheet then recording all the test values to ensure a thorough evaluation and have a record of the results.
- Remove Filters
The standard procedure for commercial airflow testing will not give consistent results for small shop testing, so small shop dust collection airflow testing is done without filters.
For larger systems filters are cleaned with an automated system that gives very consistent results. The cleaner and newer the filter the higher the airflow because as a filter gets used some dust ends up getting trapped in the filter strands that does not come out with automated cleaning. This process of fine dust getting trapped is called seasoning. Seasoning traps fine dust in the filter pores which adds to filtering efficiency and to overall filter resistance. A "fully seasoned" can provide up to twenty times better filtering than a clean new filter and it can so smother airflow that it can reduce a clean new airflow from 1000 CFM to barely 300 CFM when "fully seasoned". Filters that vent outside are tested when they are fully seasoned, meaning they have built up as much internally trapped dust as the filter can carry through its normal automated cleaning cycle. This fully seasoned testing determines how big our filters need to be made, at what pressure we need to clean our filters, and when to replace our filters. Most high-end automated systems track the resistance of our filters and automatically clean our filters when the resistance increases by more than 1 to 2 water column inches of resistance. Most other automated systems require us to manually do this process recording the pressure after every cleaning and adjust a sensor so it triggers a cleaning cycle when the pressure after cleaning rises more than 1 to 2 water column inches. As these fine particles work their way through our filters they cut and tear the fine fibers that make up our filter's matrix opening up our filters. The more open or "worn out" a filter gets, the lower its resistance. The high-end automated systems track the "fully seasoned" resistance levels and set an alarm when the filter resistance has fallen equal to or some amount below its fully seasoned level.
For small shops where filters are manually cleaned, it is near impossible to consistently clean our filters so our testing gives very different results depending on how well our filters get cleaned. Depending on how thoroughly we clean our filters, it takes about three cleaning cycles for a filter to get to half its "fully seasoned" performance. Although many small shops need about nine cleaning cycles to reach "fully seasoned", it can take as little over a year for a small shop filter to fully season. During the seasoning process the fine unhealthiest dust goes right through. Worse, even a fully seasoned filter slowly lets the fine dust work its way through the filter matrix at about the same rate as new dust builds. This passing of the fine unhealthiest dust is why ASHRAE who sets the standards for testing filters requires that filters which vent inside only be tested when clean and new.
A majority of small shop vendors advertise fully seasoned filter ratings and compute filter sizing based on clean new filters which is backward. They do this because this lets them advertise better performance and use far smaller filters which are much less expensive. This means their small shop filters that vent indoors do not protect our health and are so small in size they rapidly load up needing frequent cleaning and constant replacement. Most small shop dust collectors and cyclones end up needing their filters replaced fairly quickly because they were either far too open to provide good fine dust protection or so small in area they soon self-destruct.
A far better testing approach is to use the same seasoned filters on each unit to be tested, but this is just not feasible for most small shop woodworkers. Seasoning testing requires use of calibrated dust because even different types of wood dust on your filters will change the airflow. As a result, most end up with replacement filters that are fairly consistent larger commercial cartridge filters. It is best to test with the same seasoned commercial filter sized correctly for the range of airflow being tested. Such a setup ends up blowing away all the testing games and shows a far more realistic airflow across a whole range of machines and is clearly the right approach. Unfortunately, the filter needs appropriately "seasoned" to set a fixed filter resistance level, but doing so is beyond most hobbyists and small shop woodworkers. The only woodworking magazine test that went to the trouble to do this kind of testing to date is the Fine Woodworking April 2006 portable dust collector tests. Preparation for that article also tested every major brand of small shop cyclone, but when using seasoned filters the airflows were so bad that the vendor community lobbied Fine Woodworking Magazine to not even publish the cyclone testing results.
Meanwhile, for our own testing we have two choices to get meaningful comparisons. We can either go to the work to use the same seasoned test filters on each unit, or just remove the filters. Most choose to just remove the filters. If we test without filters, we then need to adjust the performance curve by adding filter resistance. The amount of filter resistance to add is a huge range. Large cartridge filters sized in accordance with filter material maker recommendations can add as little as 0.25" of resistance when fully seasoned to some of the smaller dust collector bag filters adding as much as 5". Regardless, we mostly end up needing to do our testing by disconnecting our blowers from the ducting and removing any filters because of their unpredictable impact on airflow. Testing with the filters off eliminates that big filter resistance variable during testing. Testing with the filters and ducting off can easily burn up blower motors because they can move more air and draw more amperage than the motors were made to handle. Filter resistance can also be checked later by testing with the filters. - Setup Manometer
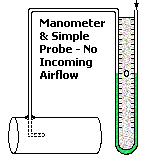 Most manometers are designed to only work at a particular angle and orientation. The Dwyer slack tube manometer that I use must be vertical and comes with magnets on its back that let it stick nicely to a steel cabinet. To set it up I need to first open the bayonet tubing connectors by unscrewing them a little. They screw down tight for temporary storage of the colored water right in the gauge without leaking, but if you forget to unscrew them, they don't work at all! I put a little of the Dwyer green dye in a plastic bottle I have that will let me hook a tube to one of the connectors for filling the manometer. That coloring makes it much easier to read. Fill the gauge with water to near the zero mark. Move the sliding ruler up or down until the zero is dead on with the water level. I connect one side of the manometer with a piece of 3/16" inside diameter vinyl tubing to my tightly sealed ducting test probe.
- Install Test Pipe
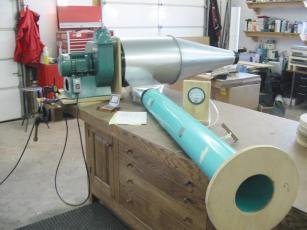 The more air moved, the more work our blower motor must do which increases amperage draw and horse power used. Dust collection blower motors are built to handle the up to six times higher start up amperage for the few seconds while they bring a heavy impeller up to speed. So, most blower motors can run for a few minutes at up to six times their rated amperage, but running a motor over its rated maximum amperage power builds up heat that will burn up our motors. This is why the industry standard also uses an amp meter and stops the testing as soon as our blower motor draws its maximum rated amperage. Going over this rated amperage causes heat to build up and burn up our motors.
Our test pipe diameter also significantly affects test results. Air at dust collection pressures is more like water so will barely compress at all. Just like a water valve reduces the opening at a single point to control flow, the smallest opening or duct size limits air flow. A test pipe that is too small chokes off larger blowers leaving them "air starved" and unable to move maximum air. At typical dust collection blower pressures, we find that:
1" duct only moves 0022 CFM at 4000 FPM
2" duct only moves 0087 CFM at 4000 FPM
3" duct only moves 0196 CFM at 4000 FPM
4" duct only moves 0349 CFM at 4000 FPM
5" duct only moves 0545 CFM at 4000 FPM
6" duct only moves 0785 CFM at 4000 FPM
7" duct only moves 1069 CFM at 4000 FPM, and
8" duct only moves 1396 CFM at 4000 FPM
The industry standard for testing is to use a test pipe diameter that mates with the blower inlet. This presumes that the blower maker sizes their blower inlet to assure the motor is neither "air starved" nor trying to move more air than the blower can handle. Moving too much air pulls more amperage than our motors can safely support resulting in overheating that soon burns up our motors. Unfortunately, with no standards or oversight, small shop vendors choose not to adhere to industry standards and many size their blower inlets to provide the maximum possible airflow by forcing use of oversized test pipes. Also, many use impellers that are too large for their motors. Many also increase airflow by testing their blower performance with oversized ducting, no attached cyclones, filters, ducting, or hoods. Oversized inlets, test pipes and impellers move more air as does running without the normal resistance of our ducting, filters, cyclones, tool hoods, etc. Most small shop vendors and woodworking magazines also test with no amp meters so they inappropriately keep testing when their motors are already drawing so many amps that they are overheating. This is why many blower motors burn up during vendor and magazine tests.
Lots of experimenting shows we need at least ten diameters of ducting for our test pipe to settle turbulent air. We also need a few diameters between where we put our test probes and the blowers or air rushing into the blowers creates turbulence that also throws off our test results.
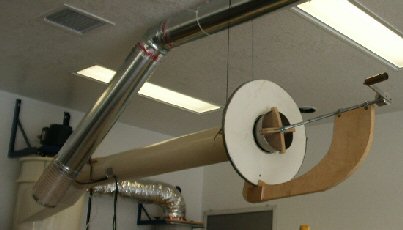 Sucked air comes from all directions at once, so when we do dust collection testing the air coming from the back side of our openings will rush forward and crash into the air coming in from the sides and front of our test pipe opening. To prevent this the industry standard is to use a circular disk sealed onto the end of our test duct. This keeps the air from behind slamming into the air coming in from the sides and front. Testing without this disc gives much lower results than the system provides in real use. If the disc is changed for a hyperbolic inlet shaped like the opening on a tuba, then we get even better airflow. Instead of using the disc that the industry experts recommend, many vendors use these tuba shaped inlets creating even larger than normal use airflow values. Key to proper and consistent testing is also to use a properly setup test pipe to test the whole range of dust collectors or cyclone-based systems with similar airflows. Picking the right size test pipe can make a huge difference in results and if too large can even burn up our motors and produce gravely inflated test results. A far more realistic test is to either use your maximum ducting size or a test pipe sized to handle the target airflow. To the right is pictured a cream colored test pipe which is propertly set up. It has the disc sealed on the end of the pipe with the attached needle valve with crank to adjust airflow from zero to maximum. It also has a properly configured pitot tube with dual air lines, plus a pressure sensor. This test tube is also properly connected to the inlet of the cyclone.
In commercial systems with multiple ducts working all at once, our mains and blowers grow large enough to handle all the airflow combined. In small shop systems we use tiny blowers that barely have the capacity to collect from a single large machine at a time, so we shut off using blast gates all but a single run. As a result our main ends up needing to be only as large as the airflow needs of our largest run, a whole different ducting design. Using mains that are too large or using down drops that are much smaller than the mains can build dangerous dust piles in our mains that pose a serious fire risk as any spark can quickly be blown into a serious fire. Air engineers established through years of testing and experience that we need 350 CFM air volume moving at 4000 FPM air velocity for good chip collection. Since most small shop vendors build dust collectors and cyclones move double this much airflow, we use a 6" diameter test pipe. Likewise, air engineers established through years of testing and experience that we need 1000 CFM with a ducting airspeed at about 4000 FPM for fine dust collection and transport from our larger small shop tools and dustier operations. Since Area=CFM/FPM we can use these two numbers and a little math to calculate we need almost exactly a 7" diameter duct for moving this airflow and airspeed. Since most fine dust collectors and cyclones are built to move some extra air, to give a fair test we need to test with an 8" diameter test pipe. This also is the size test pipe we should use for our ducting in our shops if we target for this same 1000 CFM.
Many 1.5 hp and larger small shop dust collectors and cyclones have a 6" inlet which may split into two or three 4" separate runs. These systems do not move enough air to be tested with more than 6" diameter test pipe. For those systems that claim higher airflows, bumping up to a 7" test pipe is optimum for moving 1069 CFM at 4000 FPM but also requires having a motor able to handle up to 5 hp. Bumping up to a 8" diameter test pipe is optimum for moving up to 1396 CFM at 4000 FPM but also requires having a motor able to handle up to 6.45 hp. We end up seeing a 2 hp powered cyclone with 14" impeller testing with over 1500 CFM, but also pulling more than 4.5 hp.
To test for good fine dust collection, we should target for 800 CFM which requires use of a 6" test pipe. We also need to put on the end a ring sized at least three pipe diameters large. This places an 18" diameter plywood donut shaped plate on the air inlet end. The plate reduces the "vena contracta" effect that simulates a restrictive inlet. I chose to use 6" S&D PVC for my test pipe because it has lower friction, constant size, and is easily sealed to the blower inlet. The testing standard calls for locating our 3/16" pitot tube hole at least 1.5 pipe diameters from the inlet (9" minimum) and still have at least 8.5 pipe diameters (51" minimum) to let the entering air stabilize before hitting the pitot. I made my 3/16" pitot tube hole at 12" from the inlet end. Rather than have to pull the tubing off the top of the pitot to set each SP with my needle valve I use a second gauge attached to a simple probe to measure SP (vacuum) at the same time as I measure velocity pressure with my first gauge. The testing standard also calls for the SP probe hole to be located at least 9" from the inlet and have at least 18" of test pipe before it to ensure clean air flow. I made the second hole for my probe perpendicular to the pitot hole at 12" from the inlet. This spacing and order preserve the required clean air to the pitot and probe.
One other fairly serious concern with test pipes is the ASHRAE and Dwyer Instrument test protocols clearly state that the air needs tested at different levels inside the pipe then averaged. Testing just the center gives a maximum airflow that drops significantly as we test closer to the pipe walls. Personally, I choose to just test the center with each test done using exactly the same test pipe to provide a good consistent result between units. I also know that if I test at 0", 1", 2" and the center at 3" then average will give me much less airflow.
Another advantage of the way I set up my test pipe is it saves me from having to make and mount a separate pipe for the Max SP and the Minimum Amperage tests. Since no air is flowing in either of these tests, I could make do with a short stub of ducting 12" or longer with a well-sealed connection from my meter to that duct. Alternatively, I can just use the simple probe in my long test pipe and seal the pitot. To seal the pitot connect a single tube to both the top and side outlets. - Install Test Probe
 When checking maximum SP, no air is flowing, so all we need is a well-sealed connection to our duct that connects to the manometer pressure gauge. When measuring SP for our velocity tests, we need a probe with a sealed end and fine holes in the side that will work with flowing air. This same probe works for measuring Max SP, so rather than have two connections I just use a single simple Dwyer Instruments test probe mounted and sealed 12" before the blower inlet.
- Install Pitot Tube
To get the measurements we need to compute CFM we need a well-sealed pitot tube attached to a differential pressure gauge. Although testing of large low pressure building air handling systems requires taking several readings at different locations inside the ductwork, for our needs this is not necessary. We get a little higher result, but can test with the pitot exactly half way into the duct in the test tube facing directly into the airflow. Since I use 6" ducting for testing, I carefully drew a black mark at 3" depth on my pitot to help set its depth. I also made a board with top and side V grooves. I tape this board to my test pipe so it is in line with the test pipe. I then rubber band the pitot to the side of that board to hold the pitot aligned right down the center. If not centered, it distorts the reading. The highest reading occurs with a centered pitot tube that faces directly into the airflow. You can ensure proper centering by moving the pitot very slightly until you get a maximum reading. Caution: Don't bend or force the pitot tube. This is a very precision instrument that is ruined if bent.
- Calibration
The Magnehelic® Gauge is delicate and may drift. You can calibrate it against a slack tube or digital manometer, which will not drift. Make sure the needle is set at zero on the scale by adjusting the screw at the base. This is a very delicate precision instrument and can be ruined by rough handling. Please be careful.
As an aside I have read a few posts on various woodworking forums about test gauges having ruptured diaphragms and serious adjustment problems that throw readings all over the map. I strongly disagree with those nonsense comments as I personally own six different Magnehelic® Gauges, two Phothelic® Gauges, and three digital manometers. Concerned about accuracy I tested a few of my gauges then sent them to Dwyer Instruments for calibration. All tested near identical before and after calibration and all very close to each other in their readings. - Install Needle Valve
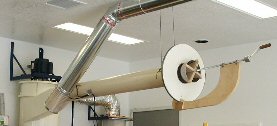
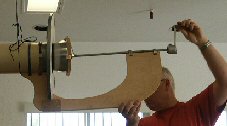
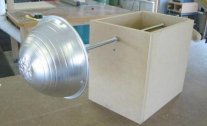
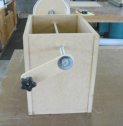
Although you can cut a number of different sized plywood donuts that you clamp on the end of the test pipe to measure how your system runs under differing resistance loads, this is not a good approach. Ideally, we would measure the airflow velocity inside a duct at a number of places then average those readings to get a better estimate. Using rings ends up creating a faster flow down the center of a pipe giving a high false reading. It is far better to make yourself a "needle valve". With a "needle valve" the air flows into the sides of the pipe and provides a much better reading. A needle valve has the added advantage of letting us finely adjust to set our vacuum at nice even increments so we can see what the FPM and CFM performance is at each level of resistance. This also makes your graph of your fan table far more accurate and compatible with industry standards for testing this type equipment. The needle valves in the pictures are either a simple sealed up light fixture reflector or round stainless mixing bowl attached to an adjustment screw. I prefer the unit that clamps onto the test pipe securely as it is easier to work with. My earlier design built the needle valve in a box, but that proved difficult to use for testing cyclones without taking them down. The needle valve must be aligned to mate with that pipe end and then is run in and out with the screw.
- Testing Scope
- Pressure Measurement Tools
- Testing Procedures
- Duct Size Test
Testing Equipment Needed
Tape measure.
ProcessMeasure the inside diameter of the ducting to your larger machines. If it is not at least 6" all the way to those machines the best you can hope to do is get the same sawdust that you would get with a broom. Small pipe will not support the air volume at typical blower pressures needed to get all the fine dust at the source.
- Impeller Size Test
Testing Equipment Needed
Tape measure.
ProcessThis test simply measures the diameter of the impeller. The easy way to do this is unplug the blower, use a tape measure and reach inside the shroud hooking on the end of a blade and measuring to the center, then doubling that radius. Once we have that diameter, the following blower/fan table will pretty closely tell what we can expect both in terms of CFM output and horsepower needs from our blowers. This table makes it pretty clear that for fixed speed small shop blowers impeller diameter is everything!
One very important thing to understand when testing small shop blowers is that blower technology is mature. This means that if you buy a blower from any of the leading manufacturers with the same size and type of impeller turned by a standard direct drive 3450 RPM motor, you are going to get near identical airflow. Unfortunately, a good portion of the small shop dust collection blowers are cheap low-quality imports which due to impeller, blower housing, inlet, and outlet construction just do not move as much air. As a result, the below table shows the maximums you can expect from a given diameter impeller wheel.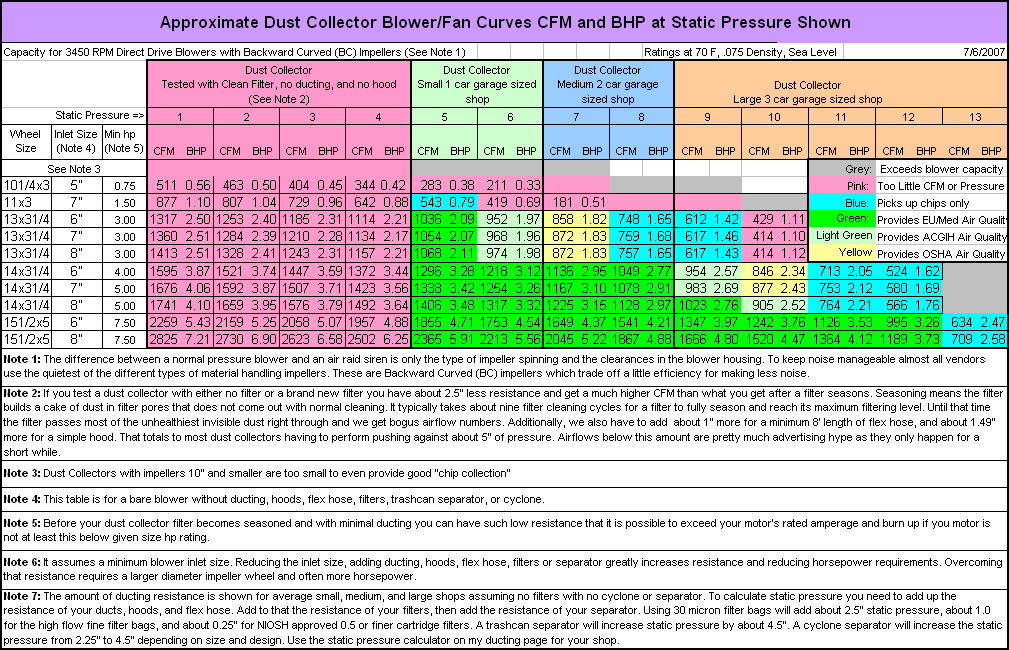
- Amp Meter Tests
Caution: The motor amperage test can be dangerous. Messing with large amperage circuits, particularly with 220-volts, can kill you, burn down your shop or home, and ruin motors. If you don't know how to do this test safely then get expert help!
OverviewThe amp tests are normally done at the same times as you do your pressure tests and provide a way to ensure your system operates efficiently and does not burn up motors. These tests let you measure the maximum work that the blower does with and without overhead and compare that to the motor maximum amperage from its nameplate. Blowers with too large of an impeller try to move too much air, so the amperage reading will be well above the motor's rated maximum amperage and can burn up the motor. small shop dust collector blowers tend to be "air-starved" and show an amperage reading well below maximum. Depending upon the motor service factor, we would increase impeller size on an "air starved" blower until our amp meter shows about 90% of the rated maximum. We need to carefully monitor motor amperage as we increase impeller size to ensure the blower does not try to move so much air it burns up the motor. Even if you have the ideal motor and impeller for your shop, that motor could still burn up if run too long without the overhead resistance of your ducting, filters, separators, etc.
Testing Equipment Needed
Another reason to monitor motor amperage is you cannot trust small shop dust collector motor horsepower claims, particularly for air compressor and inexpensive import motors. These advertised values tend to be maximums during very short loads and startup, not working values. Trying to use one of these motors based on horsepower can easily burn it up, so you need to test carefully with an amp meter to ensure the safety of your system and shop.Clamp on type AC amp meter. Harbor Freight, HD, Lowe's, etc.
ProcessStart by checking the motor nameplate to determine the maximum amperage. Write this down as motor rated amperage. We later use this amperage to ensure our system is not air starved or passing so much air it could burn up the motor.
- Blower Minimum Amperage
 The first test is often done at the same time as the Max SP test and tells what amperage your motor uses when there is no airflow. Setup for this test by removing all ducting, separators, cyclones, and filters. Install a test pipe with a sealed end, or put a seal over the blower inlet. Attach your clamp-on amp meter around one of the hot leads where you can easily read it. Turn on the blower and read the amperage. Record the number as minimum blower amps. This number becomes our target that we want for every sealed duct run to ensure no leakage.
- Blower Maximum Amperage
The second test continues with all disconnected and measures the motor amps when it does the most work. We often do this test at the same time as we do our minimum SP test for CFM to measure the maximum possible airflow. This is often the CFM value that vendors use in their advertisements and tends to be about double what we get with the resistance of our ducting, hoods, filters, separator and cyclone. In addition to telling us how much danger there is to our motor if all is left wide open, if the amperage swings back and forth on this test, we know we have a design problem, often a poor blower spiral or blockage in a cyclone.
To do the test attach the test tube, turn on the motor and get a good amp reading then turn it off. Do not run the motor for more than 15 to 30 seconds to avoid burning up your motor. Most well designed systems will show more amps than the motor rating. Record this number as blower maximum amps. - Full System Maximum Amperage
The third test reconnects the blower to your whole dust collection system and filters then again measures amperage with all blast gates open. This test makes sure that with all gates wide open, you are not going to burn up your motor. Record this number as maximum system amps and keep that value with your system.
This value is what you compare against on future tests to easily detect leaks and clogs in your installed system. If you know it normally pulls 10 amps and when checked it only pulls 8 amps you have a clogged duct. If it pulls 11-12 amps you have a severe leak. - Amperage Test Results
Using an amp meter and my gauges showed a 1.5 hp portable dust collector motor driving an 11" impeller can barely support 10' of 6" smooth interior walled flex hose and still move the minimum 800 CFM needed to capture the fine dust at our larger machines. This unit is not ample to drive permanent ducting for a small one-car garage sized shop without an impeller upgrade. A 12" impeller upgrade pushes that sized motor right to the limit so the amps need to be watched closely. Rather than risk burning up that motor, most instead go with a 2 hp dust collector with a 12" impeller. This same testing shows that the 2 hp dust collector solution is too small to power the average ducting for a two-car garage sized shop without an upgrade to a 13" diameter impeller. Adding the additional resistance overhead required to power a cyclone pushes the needed impeller size to 14" and the motor to over 2 hp. Because motors come in 2 hp or 3 hp sizes, I used a 3 hp motor for mine. Most with normal sized shops will be well served by a 14" impeller driven by a real 3 hp motor. With the ducting overhead in my larger shop, the 3 hp motor left enough extra capacity to permit my upgrading to a 15" impeller.
- Blower Minimum Amperage
- Leak Test
Testing Equipment Needed
Punk, incense stick, or cotton rope & lighter.
ProcessOne of the easiest ways to check a new cyclone for leaks is to seal off the openings and fill it with water. My friend said his first cyclone looked like Old Faithful when filled up!
I next tested to find and seal the leaks in my whole system. For safety I first emptied the dust then used a piece of cotton rope lit on one end. I could have used a fireworks punk or incense stick. With all blast gates closed and the blower running I moved smoke over each suspect joint in my cyclone, blower, and ducting. Leaks inhaled the smoke and big leaks fanned the fire to make it glow brightly. There is no danger of a motor overload during this test. As shown in our amp tests, the motor does the least work with no airflow. Unlike some vacuum cleaners, blower motors use induction motors with independent cooling fans, so in spite of the noise, it does not hurt a radial fan blower or motor at all to run with all gates closed and no airflow (this is not true for airfoil impellers). - Sealing Leaks
Metal ducts, cyclones, and even blowers leak terribly. You can seal these leaks with a special mastic backed aluminum tape or use a special sealing compound. The lightweight aluminum foil tape sold at the box stores easily tears and leaks if the ductwork moves. I recommend the heavier mastic backed metal tape from Hardcast-Carlisle, Aluma-grip-AFT-701. I also recommend Hardcast-Carlisle DS-321 sealant that comes in a tube or by the gallon from an HVAC wholesaler. You can also use the Eco-EZ seal 44-39, a good polyurethane caulk, or the 3M commercial windshield adhesive available from automotive wholesalers. Use the metal tape on joints and the "high velocity duct sealant" on seams. Most other sealants stick poorly to galvanized metal, so don't get talked into using something else, particularly silicon caulk. Silicone caulk appears at first to stick well. Unfortunately, as it cures it gives off acetic acid that reacts over time with the zinc galvanizing ruining the bond.
Rarely does a PVC joint leak and require sealing. If one does, either cover the joint with aluminum tape or use just a little polyurethane caulk on the outside of the joint after it is together so you can take it apart at some future time. Do not glue PVC as we invariably need to reconfigure our dust collection ducting a number of times and the parts are too expensive to have to replace. - Pressure Tests
Overview
We do two different types of pressure tests. The first measures how much vacuum our system draws when all airflow is blocked, and is known as a maximum static pressure or Max SP test. The Max SP test is one of the most important tests you can make on your dust collection system. Think of Max SP as "suction". The Max SP test measures how much vacuum your blower can draw measured in how high in inches it can pull water up a column (W.C.). Higher is better. The Max SP test also provides an easy way to check for leaks.
The second test measures both velocity pressure and static pressure for moving air using a differential pressure gauge at various levels of resistance. The velocity pressure (SP) provides a way to get FPM for air speed that we use to compute CFM for the air volume our system moves. You can think of this of SP as vacuum and Vp as velocity pressure if this confuses you.
It's a good idea to monitor and record the motor amperage while running your SP tests to protect your motor and see how hard it works at each different level of resistance. When at Max SP with the inlet closed, motor amps are at their minimum. At some point while closing down the inlet we reach the same resistance of your system ducting, filters, hoods, etc. At that point, the motor amps ideally should be slightly less than the motor maximum amps rating as written on the motor case. Most systems based on small shop blowers show as "air starved". Likewise, a system with too small of ductwork, too small of hoods, or with too much resistance in the dust bags also becomes "air starved". Air-starved systems frequently end up with plugged ducts and very poor collection of the fine, most dangerous dust.- Maximum SP Test
Testing Equipment Needed
-
Test pipe.
-
Simple duct probe and tubing.
-
 A slack tube manometer pressure gauge. I use a Dwyer Slack Tube Manometer model 1211-18 for the initial Max SP test. It measures up to 36" Max SP (18" x 2). I bought it used on eBay for $20 including shipping.
For the manometer tests you connect one tubing end to a duct probe and the other to the manometer. Fill the plastic U tube to the half way with water. Many add a little special coloring to make reading easier.
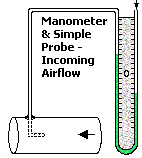 Seal everything but the blower outlet up tight with absolutely no leaks allowed, including the duct's inlet and cyclone bottom outlet or the readings will be bad. Next, turn on the blower with the slack tube manometer attached and read the pressure. It does not hurt the blower at all to run with all closed. In fact, this is when it does the least work. Be careful you did not use lightweight ducting or metal in your cyclone as this test can cause that metal to collapse. This test measures the vacuum that "pulls" the air through the tube so the water on the side of the gauge gets pulled up causing the water on the other side to go down. Do not measure the water height from the center, measure from both ends of the water column. This Max. SP should be the highest pressure you will ever see from the blower. For example, I measured about 10 inches of water when checking my Jet DC-1100 1.5 hp blower exactly matching its published specifications. Check the manufacturer's specifications for Max. SP. If your measurement does not match, use your measurement. Record this reading as Max SP.
We also use Max SP tests to spot leaks in new and existing systems. Start testing new systems with a short pipe right at your blower. That gives the target Max SP. As you install each length of duct or add bends and transitions, seal off the duct's inlet and take another reading. To test for leaks in an already installed system, simply close all the gates then do a Max SP test at the end of each ducting run. If everything has been sealed up tight the Max SP reading for each duct run will remain the same. Those who do this test are amazed at how much even a small leak will kill performance. For any runs that show a drop in Max SP, you may need to use the test with smoke to find the leaks. Seal each leak as well as you can. You may not get each perfect, especially if you use metal HVAC pipe, some types of spiral pipe, HVAC fittings, or often leaky commercial blast gates, but you should try. -
- Static Pressure (SP) Tests
Caution: Always start your SP tests with a manometer to measure Max SP. Many larger blowers can generate a MAX SP of over 15" that can hurt your other gauges, so check first to make sure the limits of your gauge are not exceeded!
OverviewOur blowers create a vacuum that "pulls" the air through the ducts. I put "pulls" in quotes because what is really happening is normal air pressure actually rushes in to fill the vacuum so with a vacuum driven system what is really happening is normal air pressure pushes the air through the pipes to fill the vacuum we generate. The strength of that vacuum is known as SP or static pressure. Likewise, the force at which that air is moving through the pipe is known as velocity pressure. We either use a gauge or hand convert that velocity pressure into FPM then convert FPM to CFM. This testing procedure follows the Dwyer Instruments recommendations that most industrial blower makers and many magazine reviewers follow to measure blower performance. We normally adjust the SP with our needle valve and record an amp reading, an FPM, and a CFM reading at each SP. Once you have made your measurements adjusting the needle valve, finish up with a graph of the values to create an accurate "fan curve" for your system.
Testing Equipment Needed-
A custom made "needle valve" to vary SP.
-
One of the following gauges:
-
A Magnehelic® gauge. This gauge requires a matching Dwyer Instruments 167-6 or 166-6 calibrated pitot tube;
-
A Dwyer Instruments Photohelic® gauge. This gauge also requires a matching Dwyer Instruments 167-6 or 166-6 calibrated pitot tube;
-
A digital anemometer that comes with its own sensor capable of reading FPM up to at least 9000 FPM;
-
A digital differential pressure gauge like my Dwyer Instruments 477 Digital Manometer that can accurately read both vacuum and SP.; or,
-
You can also make this test with an inexpensive slack tube manometer, but doing so can be somewhat complex and does not give very accurate results unless you have a unit calibrated for the right range. The procedures for doing so are located at the Dwyer Instruments web pages and come with the meter instructions. I also found a number of universities also publish test procedures for using this equipment.
Process Regardless of which gauge you choose it must be able to handle the pressures involved. One of my good friends ruined his new expensive gauge because he tried it on his shop vacuum, but that gauge only allowed a pressure range of 0" to 10" water column and his vacuum pulled about 110". You need a gauge that can go from 0" to 120" for vacuums. For dust collector and cyclone blowers you need different sized gauges. A 1 hp and smaller works well with a 0" to 10" gauge. A 2hp and smaller needs a 0" to 15" gauge. A 5 hp and smaller needs a 0" to 20" gauge.
Most with smaller dust collectors minimize costs by choosing an industry standard Dwyer Instruments Magnehelic® gauge in the 2010-AV model that has a 0" to 10" SP scale and the FPM scale. They also must have either a Dwyer Instruments model 167-6 or 166-6 calibrated pitot tube that will work with that gauge up to one that will handle 120". Pitot tubes have a top fitting for measuring SP and a side fitting for measuring vacuum. If you do lots of testing, it is not necessary, but nice to have a digital gauge or group of gauges because you will get the most accuracy with a gauge this is closest to the actual pressure you measure. Most of our usage readings are taken at lower pressures.
Dwyer also sells a Photohelic® gauge that is a Magnehelic® gauge with built in high- and low-pressure switches often used to start and stop automatic fans or filter cleaning when the pressure gets too high or low. Although new Photohelic® gauges cost far more than Magnehelic® gauges, most buyers don't realize that they are also full Magnehelic® gauges, so there is rarely that much competition to buy them on eBay often making used ones far less expensive;
Used AV style Magnehelic® gauges with the FPM scale are hard to find, but not needed because a simple calculation converts SP to FPM. The 10" AV gauges sell on eBay for about $35 with identical non-AV gauges selling for $15.
Doing a lot of pioneering I did things the hard and expensive way starting with a Dwyer Instruments 0" to 15" Magnehelic® 2015 gauge and a Dwyer 18" (36" W.C. range) slack tube manometer. I bought my 166-6 pitot tube from Dwyer Instruments for $41 then added a $9 pitot fitting and shipping. Typical eBay used cost is about $35 for pitot and fitting. My designs proved too powerful for that Magnehelic® gauge, so I upgraded to a model 2020 Magnehelic® gauge (0" to 20"). It also proved too small, lacked the AV FPM scale, and its larger scale gave poor accuracy at lower pressures where we take most readings. To get more accuracy, I added a 2010-AV Magnehelic® gauge (0" to 10"), a 2005-AV Magnehelic® gauge (0" to 5"), and a 2002-AV Magnehelic® gauge (0" to 2"). Needing to make measurements on eighteen different impellers, five different cyclone designs, and a half dozen iterations of blower design, I finally upgraded to a Dwyer Instruments -40" to 40" model 477 Digital Manometer with three digits of accuracy instead of the two digits available from my Magnehelic® gauges.Using a Magnehelic® gauge is fairly easy, but there are a few concerns. Do not use a 10" or smaller scaled Magnehelic® Gauge to test for "Maximum SP" and high SPs where most is closed. Too much pressure will break the gauge, bend the needle or ruin calibration. On the back of the gauge are two ports. The upper port labeled "high" measures velocity pressure and connects via a small hose to the top of the pitot tube. The lower labeled "low" measures SP (vacuum) pressure and connects via a small hose to the side of the pitot tube. Confusing these connections could damage the gauge by forcing it to read backward and pinning the gauge needle hard against 0. These connections must not leak at either the meter or pitot. Even a tiny leak will make a huge reading error. MAKE SURE THE CONNECTIONS ARE AIR TIGHT!
-
- Measuring Vacuum
For my system with two gauges and both a pitot and SP pressure probe I simply read SP on one gauge and FPM on the other.
If you only use a single gauge and a pitot, you can still get a good vacuum reading that we call SP. Just pull the hose off of the top of the pitot tube (this gives the vacuum pressure within the tube that causes the air to move through). Leave this tube and the pitot tube open to the air and don't plug either as the pitot tube needs to air bled into it as part of its instrument design. Just read the SP number on the top scale of the Magnehelic® gauge. This is a direct reading and no conversion is needed. - Measuring FPM
Caution! Do not let this test run for more than 15 to 30 seconds with everything wide open as that excessive airflow will draw too many amps and could seriously damage your motor. With the amp meter connected and both hoses connected to the meter and pitot tube, run a wide-open test before connecting the DC/Cyclone to your shop's ductwork or filters. This will measure the highest pressure your blower can produce. We almost always at the same time take an amp reading to get the maximum amperage the motor will draw to see how hard the motor works in a wide-open configuration.
If you have a Magnehelic® AV gauge with the FPM scale, just turn on the DC/cyclone, and take a reading on the bottom scale of the which says "X 1000" to get the FPM or feet per minute. Reading the gauge is a bit difficult because the numbers are close together and hard to read. That's why I have multiple gauges to let me pick one where the scale is easier to read depending upon what type of system I am testing. You really don't need the multiple gauges because all we need is a general idea of the FPM. Dwyer Instruments says there can be an error of 10% due to many factors, so don't sweat the last 10-FPM. It pays to run the same test more than once to see if it repeats. - Calculating FPM
If you have a Magnehelic® gauge that does not have an FPM scale, you can easily convert the pressure reading to FPM. Typical SP readings will be 1.5" to 4" with very large blowers maybe pushing 8" to 10". Once you have the pressure reading (Pv) from your Magnehelic® gauge then calculate FPM = 1096.2*(Pv/D)^0.5 or FPM * 0.7854 X area in Sq ft. This formula calls for knowing the air density (D), but most use 0.075 pounds per cubic foot as that is fairly close to normal room temperature air. If you test at high altitude, high humidity, or far from normal temperature, the Dwyer Instruments web site provides a detailed article on the use of pitot tubes and gives the conversion tables and factors to adjust to an appropriate density.
- Calculating CFM
We calculate CFM by multiplying FPM by the area of the duct used in square feet. The formula for this is: CFM = FPM * (Pi*r2/144)
For Example: The area of a round duct is equal to the radius squared times pi, so a 6" diameter duct (3" radius) would be 3 x 3 = 9 in x 3.14159 = 28.27 square inches. That divided by 144 = 0.196 square feet. Use the 0.196 number times the FPM number on the gauge when testing with 6" diameter duct to get CFM. The multiplier for 5" duct is 0.136. The multiplier for a 4" duct is .087. The Dwyer Instruments Internet site Resources section gives further references on air testing and the information that comes with each new pitot tube gives detailed usage instructions.
With our using a single center point for measurement we get the maximum flow. This is good for advertising, but not realistic because the flow on the sides of the ducting is less. Dwyer Instruments found that reducing this maximum flow by 10% gives an accurate measure of total flow. This means we need to multiply our resulting CFM by 0.9 to know the actual total flow. - Testing Existing System SP
If you are testing an installed system drill a 3/16" pitot hole 24" from the cyclone or blower intake with a straight run of at least 53 before the pitot. You can also take a reading for each run. This will tell you exactly what your CFM is at each machine and at the blower. You will be surprised at how low the reading is.
- Plotting SP to Generate a Fan Curve
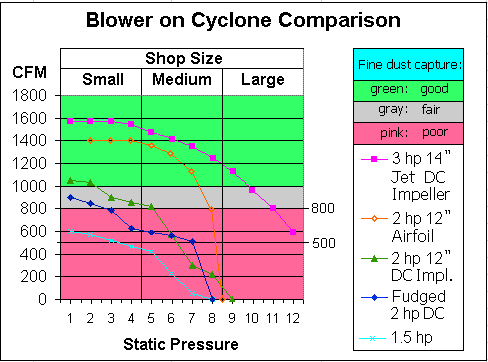
If you want to plot a fan curve on a basic blower you should use a needle valve as shown to raise the SP in even increments. Read both an FPM and motor amperage at each point. The measurement numbers can be disappointingly low compared to the numbers the suppliers have been publishing. Most small shop blowers will not go below a few SP. One and two horsepower blowers rarely go above 12 SP and three hp rarely above 18" SP. I normally fill out the test sheet when doing my testing then use Microsoft Excel to produce a graph of the calculated CFM for each SP.
- Maximum SP Test
Testing Equipment Needed
- Noise Test
Add to your "fan curve" a simple test using a decibel meter. Radio Shack and other discount firms sell reasonably accurate digital decibel meters for about $60. They typically cost about half that on eBay. Testing instructions come with the meter, but what I do with mine is try to follow industry standards that say to take a reading at 5' high and 10' away from the noise. This gives a reading at "ear height" and is about as close as I get to working next to my dust collection cyclone. That reading tells me very clearly about the need to wear ear protection when using a normal cyclone. Mine has an insulated cyclone and blower, muffler, and insulated outlet, so does not require ear protection at only 81 dB when running. For comparison, my 2 hp shop vacuum is 94 dB.
- Particulate Test
With the growing concerns about indoor air quality, most major cities now have independent testing labs that will evaluate air quality. In California we also have a State agency that will do air quality testing if they get a report of excessive illness, air quality complaints, or formal requests from physicians. I am fortunate enough to know one such tester (coached his son in soccer) and as a favor to me he evaluated both my shop and my office. He captured a volume of gas and analyzed it He followed up by using an air pump attached to a tiny cyclone that ran for hours. His lab then weighed the total amounts of material collected then ran tests to identify the types and quantities of the different pollutants. He found excessive concentrations of sewer gasses, soot, and volatile hydrocarbons in my work air. We found a leaking sewer pipe in one of the office restrooms, and that our delivery trucks making deliveries left their engines running next to our building air intake. We relocated our air intakes and required trucks to shut down during deliveries. My home shop had no problems until I sawed about 30 feet of Douglas fir with my prior dust collector equipped with its 1-micron fine filter bags. Even with my air cleaner running, my shop stayed at a level for over six hours that would have instantly resulted in a citation and shutting down of a commercial shop. The local cost for a full 8-hour OSHA/Medical air quality test in 2007 runs about $1250.
So many gave me a hard time about not being able to provide real testing results that I finally went out and bought a new set of top-quality air quality testing gauges and did considerable testing. Take a look at my Air Quality Testing page to see both the testing protocols and test results.
- Duct Size Test
Testing Equipment Needed
- Appendix A - Further References
Dwyer Instruments
Dwyer has various Internet web pages and brochures that share more about how to use their pitot tubes, pressure gauges, and velocity gauges, as well as how to calculate FPM and CFM from your readings:
OtherA good book that covers measurement is Controlling Dust in the Workshop by Rick Peters, (ISBN 0-8069-3689-4) available from Amazon.com for about $16 or locally at Barnes and Noble. This book has lots of tips and even has plans for making your own air filter using a free furnace blower. This book unfortunately is not current on CFM demands, maintaining a consistent sized main and down drop, or on use of PVC for ductwork.
- Disclaimer
The reader assumes all responsibility and liability associated with the hazards of woodworking and dust collection. Dust collection when improperly built, implemented, used, or maintained may cause serious injury or even death, so USE THIS INFORMATION AT YOUR OWN RISK! The author has no control over how a reader will act as a result of obtaining information from these pages. Your actions are your responsibility, VERIFY and CHECK information out before proceeding, and don't attempt anything without the required skills. The author shall not be responsible for any errors or omissions that may be present on these pages. Accordingly, the author shall assume no liability for any action or inaction of a reader.
The drawings, procedures and words shared on these pages are as in use by the author and shared for information only. No claims are expressed or implied as to the safety, usefulness, or accuracy of this information. Neither the author nor any other references or links on these pages will accept any liability for any damages or injury caused to people or property from use of this information or from any associated links.
These pages are directed toward a hobbyist and small shop woodworker audience and are not intended for application in a commercial, institutional, or industrial setting. Commercial woodshops are generally governed by a complex set of worker safety regulations, such as those mandated by OSHA. Satisfying the compliance of such regulations is beyond the scope of these web pages. HIRE A PROFESSIONAL ENGINEER to design, specify, test, and certify performance of any dust collection system if you have a commercial or an industrial application, allergies, other medical problems, people working for you, a large shop, work with hazardous materials, or are subject to regulatory oversight.
Unless you as a woodworker provide appropriate fine dust protections, most small shop owners put your health, the health of those close to you, and even the health of your pets at risk. Unfortunately, particle testing by the author and hundreds of others all across the country shows those who vent inside even with very clean looking shops invariably have huge build ups of invisible dust. Government testing shows on average just one hour inside a small shop that vents its dust collection inside results in more fine dust exposure than large facility commercial workers receive in months of full-time work. The difference is almost all large commercial facilities vent their dust collection systems outside, so they rarely build up the fine invisible fugitive dust that escapes collection. Even with venting outside, the peer reviewed medical research shows the more fine dust we take in the greater the short- and long-term health damage and this research also shows even with their much lower exposures almost all large facility woodworkers develop serious dust triggered health problems and significant loss of respiratory capacity. This much higher exposure information should terrify small shop and hobbyist woodworkers because of our much higher exposures. Respiratory doctors who have read these pages share small shop woodworkers and their family members often have the worst respiratory problems. Please take the time to protect yourself and those close to you.


