
Created: March 1995
Updated: April 15, 2020
Tool Discussions
- Overall Shop Comments
- Combination Machines
- ShopSmith
- Robland Combination Machine
- Another ShopSmith
- Inca
- Felder
- Hand Tools
-
Overall Shop Comments
One of my goals with these pages is to do a knowledge dump with hopes that what I learned, often the hard way will be of use. Before starting this dump, you should know a little about me as I am not the average or simple self-trained woodworker.
-
Background
Many things added to my education helping me get a good handle on what is needed in a small shop. My father was a serious go getter who apprenticed to a fine German woodworker, went on to earn union master certificates in framing, finish and cabinetry, became a senior building inspector, then started his own construction firm, which evolved into a large development firm. He took time off to serve in WW II then returned to his development work only to get recalled four times into what became the Air Force. After the fourth recall he realized that with just a few more years he could complete his twenty years and have a nice retirement, so he let his partner manage their development firm while my father served in the Air Force. Between his military salary, investments, and home flipping he did well financially and used that extra money to start a number of family businesses, most involved in construction and development. As his first born my father taught me about tools by using them to build most of our own furniture, multiple homes, refurbish and remodel numerous homes, plus much of what he did with his investing and businesses. I worked with my seven uncles all in various forms of construction doing framing, trusses, forming, floors, cabinets and more. During his military time, we lived on or near military bases with large hobby shops that taught me formal classes on how to safely and effectively use these tools. That training was helped by my taking all of the shop classes offered in my schools up through college architectural woodworking which were considerable. To that I added use of not just our large family woodworking shop, but also the large shops at the two universities where I taught engineering. I learned tools don't make the woodworker, but knowledge and tools make all the difference in terms of really good work with dead on accuracy, repeatability, and keeping our time down. We can do excellent work with just about any tools provided we are careful and take the time to get all right.
-
Knowledge
Most don't have the sometimes less than happy experience of apprenticing under a serious pro. Fortunately some of the best are available on video. For instance, here is a link to one of Jim Cummins videos that I think is a must see for most. My own background came a lot harder. Although he owned many of the best tools made, at heart my father was a Neanderthal meaning he preferred to only use hand tools to make furniture. He apprenticed to a fine German craftsman that had no patience for compromise. Some of the most beautiful work I have ever seen was done by my father, especially when making something special for my mother and his family. He made display cases, jewelry boxes, etc. that were to just die for. At first all looks simple but then on careful inspection we notice that the grain is all perfectly matched and there were no visible joints. How did he make a tree grow in a square? How do you cut a hinge joint in a box with the grain perfectly matched? The closer the inspection the finer the work, plus all felt very touchable for lack of a better term. You just wanted to not only look but touch his finer pieces. Although the work was wonderful, the behind the scenes was horrid. It takes hours of very specialized grinding, honing, sharpening, then stropping to get hand tools optimally tuned meaning beyond razor sharp to scary sharp. Keeping them scary sharp and always ready was not an honor, but was my job as his volunteered apprentice. Getting criticized for not having the planes scary sharp was no fun and birthright does not make for a happy forced apprenticeship. This background taught me enough about hand tools that I now own and prefer many of the best power tools made, but still have the best and sharpest blades, bits, cutters, and even sandpaper. My tools let me make a dozen recipe boxes in the time my father could make just one, and instead of spending days doing final shaving and fitting, mine go together perfectly first time with no adjustment needed. The difference is simply using the right tools all properly setup to be dead on.
-
Selection
We must start with good materials. Picking wood is an art with enough science you can easily learn how. For wood we need to start with knowledge of how and where it is going to be used. Different woods have huge differences in terms of being able to tolerate weather, heat and even sunlight. Some will rot in a single season and some can sit outside for generations. All woods expand and contract with humidity, so we have to choose woods and joints that are compatible with the climates in which we live. Otherwise the most beautiful projects will self-destruct in just a few seasons. Most woods have beautiful natural colors that do strange things when exposed to sunlight with most getting bleached out to some turning beautifully dark like cherry. Some woods are very stable meaning they don't cup or warp. Some will warp without any reason and are so bad they can only be used if cut very thin into veneers and glued to a stable base.
How wood gets cut can make a huge difference in how well the wood will work for our various projects. All woods have grains. Grains are what the concentric circle growth rings look like when cut. Woods that are cut so the grain runs along the length of our piece are strongest and will last longest. If the grain runs perpendicular the wood is much weaker. And, if the grain is all swirly known as burl wood, the wood is even weaker yet. Burl like grains that go all over are beautiful but even sharp planning can knock chunks out of our wood known as tear out. Burl woods require very fine blades that cut slowly and then the surfaces prepared with scrapers and sanding, so burl wood is much slower and harder to work. Many cut up trees using a slab-cutting method. Slab-cutting slices logs into parallel planks. This makes the grain on all but the center boards curved, and curved boards are prone to warping when the wood is being dried or if the wood is used in an area with high humidity. Those boards cut through the middle of the tree end up very stable, but the rest will almost always cup and warp with changes in humidity. Fine lumber mills have different cutting techniques to make sure more of the grain remains vertical. Thin pieces of wood are often cut in sheets by giant razor blades pushed up against wet logs to peel off a thin layer of wood. These veneers cut parallel to the growth rings, so these grains can make some interesting patterns and figuring. Veneers are so unstable the almost always are either glued to a more stable backer or they are treated with glycerin and other chemicals to keep them soft. Otherwise, they would warp all over, crack, and even break up.
Another huge consideration with wood choice is safety. We often want to make gifts and items from different woods, but we need to check a good wood toxicity table first as many woods contain and carry toxic chemicals, plus many normal finishes used in woodworking also contain toxic chemicals as do many of the herbicides, insecticides and preservatives used on trees and woods.
A good place to start on the needed education would be with You Tube Videos such as How to Choose Lumber for Woodworking. -
Preparation
Then we have to prepare the wood for use. The old technique still works using a long Jack plane, scraper and sandpaper, but this takes lots of practice and skill saying nothing of time only to get still questionable consistency results. Invariably, the wood we buy today is not square nor are the faces parallel, plus many woods contain nails and other things that will ruin our blades, bits and cutters. There are lots of tricks to compensate and waste minimum material, but the best technique is to start with really well chosen properly sized and grained wood. You then need to carefully use a metal detector over all the wood because too many blades, bits and cutters have been ruined because of stray nails and staples embedded in wood, especially with locally cut trees. One of my friends strongly recommends that we also examine the ends of all boards and reject all that have any sign of embedded sand or gravel. Although we do our best to make sure the wood is clean, sometimes we still get big surprises. Some friends of mine were building Maloof style rocking chairs out of thick old Claro Walnut. When cutting things out, one of them found a lead musket ball embedded in the wood! And no, our metal detectors only detect iron and steel, not lead. Dimensioning the lumber is a multistep operation. This first step is establishing wood thickness. We use a jointer to create a flat reference surface. Then we use a planner to get a parallel top and set the rough wood thickness. Then we use the finer helical planner followed by a drum or belt sanding system on both sides to get final desired thickness before final finish sanding. Then to set the width of our boards we need to first saw one edge with a dead-on straight edge that is perpendicular to the top and bottom. Then we again have to rip, joint, and rough sand to rough get all to the rough size the final jointing and sanding to get our final sizes.
After making sure there is no embedded steel or gravel, we first set the thickness of our wood. Start with a jointer to create a flat reference surface. In my shop that initial edge is further prepared by a pass on my smaller jointer. The smaller jointer has a special helical head whose special blade type and spiraled angle couple with slow feed to remove almost all the tiny curves that each pass of the larger jointer creates. With that flat reference the board goes through a large planner to create a second parallel surface then the smaller planner to make it flatter. Then the result goes through my sanding station for rough finishing.
After the wood is flat, then we need to set the wood width. We start with a square side as a reference. For very rough-edged wood we need to start by cutting one edge square and straight. Most try to do this with a table saw, but table saws create sides that are only somewhat parallel to the saw fence. The shorter the fence the greater the chance that the edge will be bowed or curved. A better way to start setting the width is to instead use a guide for a hand held power saw. I personally use the Eureka Zone track system with their longer guide. This system has a long aluminum rail that clamps on tight to the wood to be sawn. On the edge of the aluminum rail is a plastic strip that gets cut the first time you use your saw. This plastic shows exactly where the cut will fall. I use a small machinist square to make sure my saw blade is perfectly square to the saw base plate that rides in the rail track. This keeps the cut square while the rail ensures it stays straight. After using my rail system to make the first edge right on, the result gets a light pass on the jointer to create a smoother edge with no saw marks then a quick pass over my belt sanding station to rough sand the work. With that now known to be straight and square edge the result can then be run through the table saw to rough cut the width. Again, a pass on the jointer and on the sanding belt leaves the result workable, well dimensioned, and ready.
The last phase of dimensioning most lumber involves cutting to length. Initially radial arm saws were used for power cross cutting, but these were known to be terrible in terms of staying square. That left most struggling with too long boards being pushed by our miter gauges sideways through our table saws. As soon as the pieces get much longer than their support surface these cuts stop being square. For years many uses a carpenter's square as an edge guide for a hand held power saw to cut boards to length. This limited accuracy provides such poor repeatability often our pieces don't fit properly. Today many have shifted to cut off and sliding compound miter saws (SCMS). It is best to have a long station setup with stops so we can accurately repeat cutoff cut lengths. Often it is too awkward to try and use our jointers and sanding stations to finish preparing the ends, so most end up using hand held power tools for board end cleanup. -
Sheet Goods
I have used lots of sheet goods which include different plywood, pressed wood, particle board and MDF. We need to also choose the right material based on how and where it will be used. With sheet goods we have less stability problems with grain, but sunlight, moisture and temperature swings can have a huge impact. They can cause bad warping, delamination and can even turn back into sawdust depending on material and glues. Previously, like most others I had to manhandle the heavy sheets up onto my table saw, use auxiliary tables and a roller system to support the work and then still had to make rough cuts to oversize the material due to lots of tear out. The rough-cut material once broken down into manageable pieces then went back to the table saw with a finer blade to make the final fine cuts. All that changed with the same straight edge system I use for preparing square straight edges on boards and rough-cut lumber. This track system has become my only way to manage big sheets. My system is simple. Onto two sawhorses I place a big sheet of construction plywood then a 2" thick sheet of construction insulation foam followed by the sheet to be cut. This creates a big flat work table. The foam gives me a base to cut on so I don't cut my saw horses or the plywood, plus the foam keeps dust from spraying all over. In fact, with my strong vacuum and well enclosed saw the result works so well very little dust escapes collection at all. I find with a good Freud Diablo blade on my power saw I get an excellent finish cut and do not need to make the rough cuts saving considerable material and handling. Moreover, if I tape the backside of the cut with masking tape there is almost zero tear out. The bottom line is this system works so well that it is the only way I cut large sheet goods.
-
Tools
Almost all jointers, planners, sanders, chop saws and sliding compound miter saws can do these jobs fairly well. How well they work depends on how flat all the tool reference surfaces are, how accurate and good the bearings, motor size and smoothness, the quality of our blades and how well we keep these tools set up. We all have different needs. If all we ever do is use standard box store lumber to build simple shelves and such or we have access to large tools to prepare my rough stock, then there is little need for having these larger tools in a shop. Both due to finances and being fussy, my shop almost always starts with rough cut lumber that costs far less than surfaced lumber. That means I want to tightly control all of the dimensioning and lumber preparation process. Although I purchased many of small shop jointers, planners and chop saws, all slowly got replaced with commercial heavy-duty equipment. The quality of equipment I most like greatly exceeds my budget. One of my friends buys whole shops from commercial firms that closed. With his help I was able to find a full set of commercial Delta and Powermatic three phase tools that all needed some serious tender, love and care to rescue and refurbish. After taking all the rust and paint off, my machinist friend helped me machine all their surfaces dead on flat and install all new heavy-duty bearings and bushings. All then got powder coated painted up better than new followed by getting them all new blades, bits and cutters. To power these beasts, I bought a high quality American Rotary phase converter that works like a champ. Had I purchased newer all digital tools I would have used a top-quality digital phase converter such as the Phase Perfect. Digital tools are far less tolerant of the variations that come with rotary phase converters. The bottom line is my whole shop was outfitted for far less than equivalent small shop tool costs. My mix of tools continued to evolve from the early seventies with my first serious shop to now having some pretty impressive machines that frankly do little but gather dust because I badly screwed up on my dust collection and ended up developing bad allergic reactions. Although it took over fifteen years for my body to settle enough that the reactions are not too bad, I still have to work with heavy respiratory controls and a strong fan venting my shop whenever making dust.
-
Background
Unlike the ShopSmith (see the following discussion) and its much lesser quality copycats, European combination machines put a lot of very high end, powerful equipment in a single package that costs less, and takes up less room than individual machines.
I owned a MiniMax joiner/planer way back when I had a production shop. It was a dream and worked well until a part broke. I soon had two new replacement industrial Delta units with local support. Six months later my MiniMax joiner/planer was still broken waiting for parts. I hear they are much better today, but I would still recommend some very careful homework to make sure you don't have a lot of down time, have local parts, and guaranteed repair times.
As part of that homework, realize that anyone who puts out this kind of money for a machine will be crazy in love with it, so swear about how good they are without a clue. I found it best to only listen to those who have owned their machines for at least 5 years. Go to the Yahoo user's groups and you will find a ton of good information on the Robland X-31, Felder, and even the new Mini-Max combination machines.
I also own an Inca joiner/planer that I have had for a lot of years. Although not "big iron" by any stretch, with sharp blades its few degrees of tilt on the cutter creates incredible finishes. Too bad they are no longer supported.
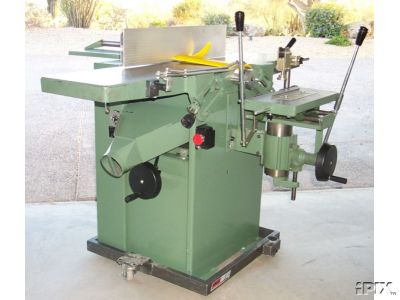
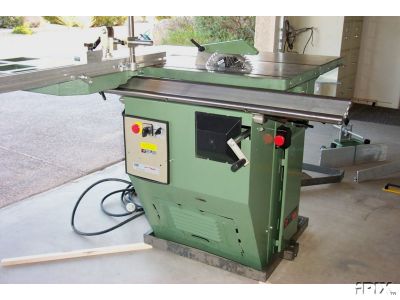
After selling off my commercial cabinet shop I wanted something at home with plenty of power and features that would fit in one bay of a three-car garage. After lots of homework and playing with a Felder for nearly a year, it came down to a new Felder or a Robland. Long ago I learned to buy best quality then take really good care of it. I bought a new Felder and just like my engineer friend who bought his to build his dream retirement home, mine was a nightmare that kept burning up motors. I bought one of the early single-phase machines because I did not want to also pay for a three-phase power convertor. That was a big mistake. The Felder single phase 50-cycle motors could not handle our 60-cycle power. After my Felder burned up four motors in less than a year, I got rid of it to a consignment shop and bought a Robland X-31. It was a great machine that I got as a demo unit through a local dealer for Laguna Tools. I loved its small footprint and mobility kit allowed me to move it to the front center of my garage which left enough room to still put both of cars in the garage at night.
I quickly tired of the setup/take down problems of having all in the one machine, so my first Robland went to a friend and in 1994 I upgraded to Robland separates - joiner/planer/mortising and table saw/shaper. The Robland separates gave me the best of both worlds with few of the setup/take down problems that others complain about. Mine were purchased from Bridge City Tools when they were briefly a Robland dealer for Laguna Tools. Two parts were broken in shipping and Laguna had both at my home within 24 hours of my call. I've gotten many years of flawless service from my units and am active with the Yahoo X-31 group. I helped Charlie Belden by using my machinist to build sliding table alignment jigs that quite a few members bought. My machinist has since retired, so unfortunately we don't have any more of these jigs available. Enough were made that you might be able to ask on the X-31 site and borrow a set.
I did make some changes to my Robland and have more in the works. First, I upgraded to the larger sliding table which is a must if you do any cabinet, larger work or cut plywood sheets. Then I modified my sliding table cam action hold down clamp with a rubber pad so when the clamp is used, it no longer dents my work, plus hold all well without moving the work out a little. The fences that sit on the sliding table were a pain to adjust just right, so I also spent a lot of time with my machinist tools to permanently scribe marks and put in some stops so my table long and short fences quickly set dead on at ninety degrees to my saw blade. Next, with the large steel out feed table that comes with the saw/shaper I modified that table to hold my Porter-Cable router in line with the saw and shaper so I can use the router also with the sliding table. I installed the full Biesemeyer fence system that I bought from Amazon.com to replace the not too convenient short Robland fence. I also have an Incra incremental positioning jig that works with the table saw, shaper, and router.
If I were buying today and my budget was short and I was limited in space, I'd watch eBay and the Robland X-31 forums like a hawk and buy another X-31 or hopefully get lucky and get the Robland separates like mine that together make up an X-31.
I now own a new set of the larger 7.5hp Felder three-phase separates with digital phase converter. Mine has the 16" wide joiner planer so can really handle the rough-cut lumber I buy because it is so much less expensive. I went with mine after a number of my friends bought these and reported Felder has fixed the early problems mine had. Mine has the large sliding table and a very heavy-duty power feeder. This Felder is a much more precise machine than my Robland, but is not quite as forgiving or easy to use. I appreciate really fine, well-made tools and Felder makes one of the best for home shop use. If I were going with a commercial shop and dependent on this for my living, I would go back to the commercial Delta or Powermatic professional 3-phase tools.
-
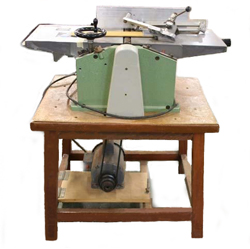
ShopSmith Introduction
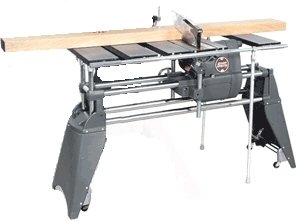 I was talking with one of my pretty successful friends about his new wood shop and tools. It seems we both had a very similar evolution in the growth of our woodworking and compliment of tools. Well, he has outdone me by buying himself top of the line Felder separates with all the goodies. They are absolutely wonderful with electronic accuracy to the nearest ten-thousandth of an inch. He is also a retired machinist/engineer so added his own even more incredibly electronic measurement sensors. Regardless, our discussion came around to what we have really built, and strangely both of us came to the same realization. Just about the time we gave up our ShopSmith systems, we became more tool collectors than woodworkers. That of course led to a trip down memory lane figuring who had been working with the ShopSmith the longest. It seems I "won" that one and he said I should share on the Internet. Well here goes.
My first exposure to a ShopSmith was with my father not too long after my father finished an Air Force assignment in Japan in 1957. Before volunteering to serve in WW II as a fighter pilot he earned his union master carpentry ratings in frame, finish, and cabinetry, went on to become the chief building inspector for the city of Denver, Colorado, and was part of the team that helped rebuild Pearl Harbor. His apprenticeship in the old hand styles of European woodworking evolved into building right now. He wanted me to know the old ways, so before I was ten, I could sharpen and set saw teeth just right, tune a scraper into something dangerous, and sharpen a chisel or plane blade into something that could split a hair with ease. Throughout my father's woodworking he always favored doing things with hand tools, but also was not afraid to use the big iron when time or volume required. After tiring of having to replace his heavy-duty shop iron with every military move, he went looking for an alternative that could follow us on our frequent moves. We caught one of the early ShopSmith demonstrations.
That demonstration was an incredible turning point with my father. Frankly, he previously hated power tools thinking they were a weak person's excuse for not learning how to do things right or keep your tools sharp. He never did anything impulsive in his life, and then was no exception. We talked about it and came to the conclusion that real people could never do what we watched as those demo experts must have trained for months to get that skilled. Our base hobby shop had a ShopSmith and I was finally allowed to use it for turning. My father liked that unit enough that one followed him home, but it vanished with our next move. I did not see another ShopSmith until 1960 when an old airframe and power plant mechanic was helping us to rebuild the lower wings on our Beech Staggerwing biplane. I watched the lights go on in my father's eyes as he watched that friend use that tool and jigsaw to do nothing short of absolute magic. He found one used and it followed him home, but again vanished with our next move.
My father decided to retire in California and had for years been designing his custom dream retirement home. In fact, he built the first version in Louisiana then he and my mother came up with hundreds of improvements. In 1964 he built the revised version of that home and saved quite a bit by our doing much of the work ourselves including all the finish cabinetry. He rented a ShopSmith just long enough to finish that home. When it went away it took my dreams of being able to use it to build all kinds of things. Meanwhile my uncle who lived in the area was so impressed he asked my father to build a home construction firm as part of his retirement. My father said he would set that firm up and keep an ownership position, but he was no longer interested in doing that kind of work for a living. He and my uncle setup a custom home shop with attached cabinet shop that soon became the cabinet supplier of choice for much of this area. My father equipped that shop with commercial Powermatic and commercial Delta tools, but also added another ShopSmith. He liked some of the things that tool does well.
A few months later I met a fellow who eventually became my best friend. His father was one of the senior engineering professors in our area and had access to the university's full professional engineering wood shop. He also taught the advanced architectural woodworking classes for the university. Even with access to all those tools, for convenience he bought and used a ShopSmith to build a large extension onto their home. As My friend's father eventually became my mentor and one of my closest "adult" friends with our working together on innumerable projects as I went through engineering school and was starting my career. Strangely, as well as we got along neither he nor my father would let me use their ShopSmith machines as they both these ShopSmith tools were just too dangerous.
Safety I been using ShopSmith tools since the early sixties and yes they do have many limitations and like any other power tool can cause serious injury or even death, but they still are a pretty incredible tool when you have either space of financial constraints. ShopSmith combination machines are one of the most heavily sold stationary power woodworking tools ever, and although considered by many to be a toy, they are instead a really great and well-made system if you will take the time to learn how to use yours safely and efficiently. The biggest danger I learned the hard way is that a ShopSmith is unsafe whenever you work larger boards and sheet goods unless you have both an in-feed and an out-feed table. It takes some preplanning to minimize the overhead of doing constant setups and take downs, but the book that comes with these units gives lots of good advice on staying organized.
Quality The fit and finish on the ShopSmith is far better than most of the imports including my Inca, Fein, Robland and early Festool tools, and miles better than most of the stuff coming out China. Factory support service is excellent, both from the Internet and from their toll-free number. I broke a switch when getting a little careless moving another heavy tool. Two days later ShopSmith had that switch in my hands. Cost for the part and shipping were both fair. Although I could have picked up a less expensive switch locally, the one I got was an exact match and replaced a switch that has one of the most difficult of duties. It reliably powered a high startup loaded 12-amp motor for over ten years so was excellent in quality.
Utility In addition to being well engineered and made, ShopSmith combination machines are workhorses capable of doing a fair to good job on all different kinds of woodworking, and really excel on small projects. The early ShopSmith units were a little underpowered. All ShopSmith units require some advanced planning when it comes to changing functions, but you can make them work. We built a 5000 square foot home with ours including all its cabinetry and fine woodwork. We did have to build in and out feed tables to handle longer boards and sheet goods. My best friend's father added a large extension to their home also using a twin unit. Way before we had chop saws or even affordable radial arm saws, our ShopSmith regularly went with us to job sites helping to cut all of the lumber and most of the plywood to build at least four homes and innumerable cabinets. The ShopSmith also makes a great standing station with disc, belt and pneumatic drum. The horizontal drill press feature provides a more secure mating to edge join boards than using biscuits and the board height ends up being a perfect match.
There are lots of factory upgrades and other improvements you can add to your ShopSmith. Adding a good thin sharp blade (Forrest is my preference) and standard saw arbor really helps saw performance. Adding a good incremental positioning jig like my Incra setup provides a level of repeatable accuracy for inlay and layered fine woodworking that must be seen to be believed. When I sold my professional shop, I went back to using a ShopSmith but eventually added an Inca table saw, Inca jointer/planer then a Felder followed by my Robland units. Once I had the Robland separates, I found myself with too little room so my ShopSmith found a new home. Believe it or not, I soon bought another used ShopSmith and found room for it because there are some things that it does so much better than any of my much heavier tools. Mine always sits ready to go as a full sanding station. Unlike my Delta sanding station, it lets me control the speed to get just the performance needed.
Purchase In terms of buying a ShopSmith, go looking for a good used unit, preferably a little used model 510 or later. The lighter motors and lighter bearings plus smaller tables on earlier models work fine, but require more maintenance, are not as accurate, and are harder to find parts for.
Purchase Accessories I would pass on their band saw, planer, jointer, dust collector, router, and jig saw. I've owned all of these various accessories. All of these except the jigsaw work well, but they are all so small that most will soon find a need for larger units. I found each of those units do not work as well as dedicated separate tools, plus those accessories often cost more than the dedicated accessories. I really do like the ShopSmith sanding disc, conical sanding disc and their belt sander. -
ShopSmith Features
I started using a ShopSmith in the fifties with my father. It was a little underpowered and changing functions required some advanced planning, but if that is all you have, you can make it work. I set up two professional shops and both ended up having used ShopSmith in corners that always seemed to come in handy for taking care of the unexpected that we could not do with our stand-alone machines.
Table Saw I immediately upgraded my ShopSmith to use a standard �" arbor then went out and bought a top of the line Forrest combination saw blade. With a good blade, in spite of having to move the table up and down to adjust blade height, the ShopSmith is the most convenient saw to use in my shop for small projects. When working on longer boards, thick boards and plywood, realize that the ShopSmith can flex enough to cause some nasty kickbacks even with the excellent splitter on the 510 and later models. Always protect yourself by standing out of the line of fire and always use push sticks, feather boards, and hold-downs. Likewise, in feed tables, out feed tables and jigs are a must to ensure maximum safety. These tables must be variable in height and setup to match the height you set the table for cutting or they will not work safely. I personally use the ShopSmith brand of extension tables as they are easy to move up and down as you change table height.
Lathe With the upgraded steady rest, live center, and appropriate faceplate that comes on the 510 models and later, the lathe is quite usable for all but large or out of balance pieces. The Nova chuck works well on larger pieces and bowls. When my daughter discovered the lathe she would take a piece of green wood and see how long of a shaving she could create. That was more fun than "making" something. She has already given me notice that as soon as she gets a home of her own "her" ShopSmith and band saw are going to move in.
Drill Press & Mortising The mortising feature is far better than my industrial-mortising units because the big table and moving quill allow much better control and accuracy. I choose to mortise by drilling straight in to protect the quill bearings then using mortising chisels or mortising bits with hold-downs for cleanup. The drill press is also excellent with the speed control being a real plus, but this feature is inconvenient compared to a dedicated drill press. I still use the ShopSmith drill configuration when needing the big table or having to make a weird angle.
Disc, Belt and Drum Sander Attachments The 12" conical disc, flat disc, pneumatic drum, and belt sander attachments provide excellent results with the variable speed making them far better than my much more expensive dedicated Delta sanding center. If you drop either disc, you may have to replace them because once out of round then don't work well at all. When in good shape, they work so well I eventually got rid of the dedicated Delta sanding station and bought a used ShopSmith Power Station that is now setup belt and discs.
Joiner, Band Saw & Planer The 4" jointer, band saw, and planer are all things that you can get in bench top units with their own motors for equal or less price and better functionality, plus I found tools of that size are great for small projects but near worthless when dealing with sheet goods and larger projects.
Auxiliary Power Station I bought one of these when I picked up a ShopSmith joiner and 6" sanding belt. The price was right, but really did not think I'd have any use for one of these. I was wrong. That center worked so well I got a second that I setup with a couple of the other ShopSmith accessories, but when I upgraded to bigger stationary tools, the smaller ShopSmith accessories and second Power Station found a new home.
Dust Collection All ShopSmith ports are too small and hoods not well enough made for good fine dust collection whether you use their DC3300 or a larger unit. All require auxiliary hoods for good collection.
Dust Collector The ShopSmith 3300 model dust collector is a very well made "tank" that provides excellent "chip collection" but spews fine dust all over. I used my DC-3300 dust collector as a second portable in my shop until converting all over for fine dust collection. If you have one of these I strongly recommend that you replace the standard 2.5" 3-way adapter with the ShopSmith 4" inlet to make a huge difference in airflow.
There are two safety issues with the DC-3300 dust collectors that are not well documented by ShopSmith. First there is a fire danger. The blower and motor on these units sits between the plastic bottom collection bag and the top felt filter. As a result, the motor gets poor cooling and will quickly clog its internal motor cooling fan with lots of dust. You really need to thoroughly blow out that blower motor with compressed air every ten to twenty plastic bags of sawdust. Second, these dust collectors move between one tenth and one third the airflow needed for good fine dust collection at most stationary tools. As a result, you should wear a good dual filtered NIOSH approved properly fitted respirator mask like the 3M 7500. You also should work with a main door open a little and a strong commercial fan blowing out a back door or window. Our particle counters show the mask and fan need to go on before starting any woodworking and both should stay on for about one-half hour after making fine dust to get rid of the buildup of fugitive dust that escapes collection.
Bottom Line: With all that said if you have a space problem and want to make boxes, trinkets, turnings, kitchen and other small things found in craft shows, etc. you really cannot get too much better of a unit. The ShopSmith will do for making furniture but you need to get and stay organized, plus add some extension tables, either homemade or from ShopSmith. If unorganized the changeover problems will drive you crazy. If you are going to be doing mostly flat work (cabinetry) this is not the right machine even with all of the extension tables and roller assemblies, but can be used in a pinch. I prefer the Ez-Smart and Festool rail systems that let me accurately cut sheet goods with my portable power saw. I also use this same system for routing and working with my saber saw. -
My First ShopSmith
After using a ShopSmith with my father, uncle and best friend, it was a natural when starting a small woodworking shop in the sixties while I went to college. Just after starting college at UC Davis I got a basket case ShopSmith and spent way too much time rebuilding it. It lived in a friend's barn that we converted into a shop. It served us well helping to refurbish many homes and build the insides for Fanny Anne's Saloon, the KZAP radio station, and then the first Old Spaghetti Factory facility in Sacramento, CA. We made enough off our projects that we soon had a fully equipped shop with a big MiniMax joiner planer, commercial Delta 3-phase table saw, on and on. Both of the two professional shops I later set up also had ShopSmith combination machines in corners that always seemed to come in handy for taking care of the unexpected that we could not do with our stand-alone machines.
I was a pretty hard charger and well on my way to my first millions before getting out of college. Moreover, I was accepted into medical school and had my life all figured out. Instead, I got a number 10 on the first draft lottery, and landed in Vietnam just a short time later serving as an aircraft tail gunner-loadmaster. Only two of the ten of us who started together doing that job made it home whole and today I am the only one still alive from that group. Frankly, I am not sure I came back whole either. I came home a very changed person. It took me quite a while to get any motivation back at all or to even notice that my ShopSmith was long gone. -
My ShopSmith History
I was one of the few reservists activated to serve in Vietnam. After a short tour I came home and continued to fly with the Air Force Reserves. When Vietnam fell apart and they needed volunteers to help get our people out, I quickly volunteered. On my way home after working around the clock for days on flight surgeon provided stimulants, I flew home on an empty plane that was sprayed for rats and fleas without being aired out. That 1972 accidental poisoning put me into a coma for three days. I awoke to overhear my military doctors say they not expect me to live. Disliking that prognosis, I checked out of that military hospital by pulling my IV and leaving. I returned to the Sacramento, California area where I helped do medical research. My doctor friends put me on a strong detoxification program, but still did not expect me to live past my next cold or case of flu. They also assured me that fathering children would produce teenage mutant ninja turtles. I worked hard rebuilding my health and building up the basis of what became today's PC movement. My prognosis went from just fatal to only grim.
One of the few things I still enjoyed doing was woodworking so I soon after picked up a basket case ShopSmith and decided to spend the time to make it the tool I really wanted ShopSmith to be. Those were tough times following the local aerospace industry collapse. Our family home business was not building any homes and almost no custom cabinets, so in spite of five years of UC Davis engineering, the only job I could find was as an engineering technician at CSU Sacramento. That job made for many top-quality machinists and engineering professor friends always ready to help. With lots of their help my ShopSmith 500 slowly became a very different machine. I upgraded the motor, put a crank on the table, made the table larger, added a different heavy bearing to the quill, added a built-in router table with speed increaser, added in feed and out feed tables, and tweaked the dust collection significantly. My most interesting change was to mount gear bars on the front and back of the table with matching teeth on the fence and a micro adjustment. Those changes coupled with a glued-on ruler to make rock solid alignment with total repeatability. That unit served me well especially after my cousin and I restarted the family construction business to refurbish homes. One of my professor friends was ShopSmith crazy and kept after me to sell him my modified ShopSmith. After my cousin and I had built up enough money, we purchased a full set of Delta commercial tools. I finally let my modified ShopSmith go to my professor friend. He liked it and the changes so much that he sent many of the changes to ShopSmith. Some of those changes got into the ShopSmith Model 510.
I was wrong to let my unit go. We still needed the ShopSmith for too many things so I did it all over again with another ShopSmith basket case, but was not quite so crazy in my changes just adding a table crank, extra quill bearing and my router table option. I slowly added parts until I had most of the accessories then used that unit to help rebuild an old farmhouse way out in the country. I learned the hard way that living too far from neighbors has serious drawbacks. I came home from a long military reserve flight to an empty home and empty shop. Somewhere out there is an old ShopSmith with bigger bearings than today's 510s. In 1974 with the help of my insurance company, I bought another used ShopSmith, upgraded its bearings, then went to work restoring a Victorian mansion in downtown Sacramento that was previously owned by D.O. Mills who was a banker that financed much of the gold rush. My first wife was badly hurt in an auto accident and ended up in a care facility, so I got rid of the Victorian and my ShopSmith.
In 1978 I bought another ShopSmith, that time fully assembled and working. After upgrading the quill bearing it served my cousin and me well living in our shop and helping us to refurbish more homes. In spite of my working full time as a university instructor and for the State government, I still make much better money "flipping" homes. Soon after my wife had a miracle recovery and in 1979 asked for a "friendly" divorce. That did a world purge for me where most of my possessions got liquidated for pennies on a dollar with the results getting transferred to a hungry attorney. Sadly, my ShopSmith was just one of the many casualties.
I hid in my work as a senior manager and university teacher earning two full time salaries with almost no expenses. My finances quickly recovered and I could buy whatever tools I wanted. I bought a home that already had a nice shop, then replaced my hand tools followed by some small power tools. Unfortunately, I had no time to use them. All sat collecting dust until October each year when I started my Christmas projects. I remarried and bought a new home in 1981 with no shop and no room, so let the few tools I bought go to my cousin. In 1985 I bought a barely used ShopSmith 510 from another divorce mess. That unit came with just a dust collector, so I went looking for accessories. I found an old 500 that a son inherited and did not want. It had everything with many newer 510 accessories, so I ended up paying way too much, but got his father's entire shop with everything from hand tools to a shop full of odd clamps, a homemade workbench, lots of bits and cutters, and all the ShopSmith accessories. I found the easiest way to avoid the setup and change over problems with the ShopSmith is just own two ShopSmiths plus a power station. My belt sander and band saw had a permanent home on one power station. The 510 stayed a saw with my custom joiner table and the backside being a sanding disk and joiner. I also made a router table that fit on the ShopSmith bars and held my Porter Cable router, plus a nice accessory bench with drawers that fit below on the 510 stand. The 500 became my drill press and lathe. About then I lost one of my good friends and ended up buying from his widow his near new Inca table saw and Inca joiner/planer. I liked those tools so much I also bought the bigger Inca band saw. That combination helped me get a lot of work done including considerable furniture much of which was 5/4" heavy red oak plus a rocking horse and rocker for my infant children, and lots of fine gifts for family and friends.
The bad news is all those tools just barely fit with the most careful effort alongside and in front of our cars in our garage. Between two kids and my tools we clearly needed a bigger house and got it in 1987 with a big three-car garage.
After a couple of busy years putting together a new home just the way we wanted it, in 1990 I had another world changing wake up call. A minor ankle surgery nearly killed me with a post-surgery infection. I had to cut back to less than one full time job and to be able to work from home took a four-step demotion from director to a lead computer analyst. That infection got into my joints leaving me with a pretty bad leg and worsening degenerative arthritis all over my body. As I slowly recovered my health, I spent more and more time with my children and out in the garage with my tools. Finally, in 1992, my wife told me to go buy big heavy-duty woodworking tools I so long wanted and planned on getting when we moved into the new home. I agonized hard between the Delta commercial units, Grizzly alternatives, or a top of the line European combination machine. Only the Felder and Robland combination machines caught my attention.
I wanted the Delta commercial grade tools but they were too expensive and the Grizzly just did not measure up, so I went shopping. A friend who went from wood shop teacher to equipment sales had a Felder in the back room of his shop where he still taught classes. He had a bad love-hate relationship with that Felder. He said it was the finest, most accurate, and most fun to use cabinet saw he had ever worked with, but also by far the fussiest. He said he went through pure hell when he bought it because it would not setup correctly, there was no manual, and they gave him European motors that in spite of their promises kept letting the smoke out. Just like Intel's chips, you let all the smoke out and they don't work anymore!
Regardless, my friend talked me into buying a twin Felder to the one in the back of his shop. Mine was supposed to be far better because it had the new motors designed and built for the U.S. I quickly grew to love and hate that machine. It was so powerful and smooth cutting, planning and shaping wood took no effort. Unfortunately, my supposedly bullet proof motor let the smoke out just weeks after delivery. Felder replaced three motors quickly and a the fourth that burned out took nearly forever to finally arrive. They admitted this was their fault, but did not have a workable solution. After less than a year and going through four motors with my machine down far more than up, I reached my limit. Felder would not take it back due to a problem where my dealer had sold it to the woodworking shop and I bought it from them. Regardless, it ended up back in that same woodworking shop and eventually sold on consignment.
A mutual friend who is a retired mechanical engineer loved using that same Felder at the shop where I bought mine. He thought it was the nicest woodworking tool he had ever used, so he bought a new one upon retiring tried to use it to build his new retirement home. Only part of his order arrived and less than a year later he had spent a small fortune replacing three motors, one of them twice. He said that tool single-handedly made his house building almost a year late. He offered it to me $5,500 with about $3,000 in accessories and tooling. After what we each went through, I wanted no further part of that mess. Like me, he reached his fill and dumped his off at a tool dealer on consignment.
A local woodworking supply firm became a Robland dealer and had a show with Torbin, Laguna Tools' owner/founder doing a demonstration. The show early on had almost nobody there, so I had a chance to talk to Torbin. I shared my Felder nightmare and Torbin offered me the demo unit he was using at that show for a big discount. In shipping from LA to Sacramento for the show, one of the joiner table mounts had cracked, so the local firm took my deposit promising to fix then deliver that unit in a few days. Two weeks later I still had no machine and I heard second hand that this same firm resold my unit to someone else for quite a bit more. They gave me a choice of either getting my money back or paying full retail. I called Laguna and spoke with Torbin. The local firm lost their dealership and I bought a Robland from Laguna. Not long after, I sold that Robland because it was too big to lug around as a portable in my garage based shop and replaced it with my Robland separates from Bridge City Tools.
The Robland units were great, but I never was totally happy with fit, finish and accuracy. I made up my mind that when my kids finish school in a few years, we are going to move out of this monster home. I wanted a place we can keep up that either has or has room for a shop. At that point I hoped to buy a Felder. I met Brian Lamb in the Robland group and followed him to the Felder group. I thought I would watch and learn before I make a move on the Felder.
I've had my Robland sliding table saw and joiner/planer combination machines for twenty years. My saw jointer unit came with the small sized table, but I immediately upgraded before taking delivery to the large table. The tables come in two sizes, go for the larger for sure. You will not have any regrets. I also did two other upgrades. I bought the long and short sliding table fence rails. Neither takes long to put on, but the long one is too big for most of the fine boxes and panels that I spend most of my time on. Also, the long fence rail is wonderful when you need it and the rest of the time it is a pole looking to jab you. I also got an extra cam clamp so I can leave one on my mortising table and the other on my sliding table. One on the slider is plenty to clamp just about anything rock stable. I glued a piece of 3/16" thick conveyor belt material on the foot of that clamp to make for a better grip without so much chance of marring the work. If one of these eccentric clamps does not come with their table kit, you really do want one.
At first the sliding table was a bear because it always seemed to be in the way and getting it adjusted just right was a pain. Now you could not talk me out of a slider with a big pile of cash. That big slider will manage anything I can give it and it works equally well for my shaper that sits behind the saw. Not only do I use it to help with ripping via use of a sacrifice board clamped to the fence, it does my cross cuts and most of my angle cuts as well. And for what it is worth, the table in spite of a lot of use is still dead on in adjustment.
The Yahoo sister Robland X-31 site has some good advice, pictures and a write-up on making the sliding table adjustment easy. I suggest you spend a few dollars more and get the jigs that reference off the table top to make setup a snap. The only problem I have ever had with this table was my own fault. I had a full piece of heavy oak 3/4 ply stretched to the extreme in feed of the table getting ready to saw. It was so big and heavy that the saw began to tilt. This was my own fault for not putting down the outrigger. I fixed that by using some of the heavy Robland plywood packing to build three roll around cabinets with locking wheels that are exactly saw height. They give lots of good support and a place to store the tools I use on projects.
Also, my dealings with Laguna have been a dream compared to some of the war stories I had and other have had with other vendors, particularly the low cost import sellers. Laguna really does want you to be happy and pleased.
 I am pretty slow as had previously repeatedly given up my ShopSmith only to end up chasing down another. I knew they are just too handy to not have around for making the small things I like to give for gifts. In every case, each fellow who sold me their ShopSmith unit contacted me within a year or so wondering if they could buy it back as they found they missed many of its features. Regardless, with three ShopSmith units and their power station plus the big Robland separates, I was out of room in the one bay in my garage-based shop. I assured myself that I no longer needed a ShopSmith and ended up selling them all. As before and with others, I soon missed mine considerably.
Another friend had his wife say either his ShopSmith 510 left or he did, so I ended up with another ShopSmith. I guess I should not admit it but after nearly fifty years of woodworking I have accumulated a garage full of the kinds of tools that would make many serious woodworkers drool. With my garage also used for storing cars, my tools are stacked one on another to the point I often find myself firing up the ShopSmith when I need something quick. It is always there, works every time, and immediately usable without having to clean off and roll out my 600 or 800-pound monsters.
Meanwhile my teen nephew took a bad bicycle fall that broke his neck and left him in on a respirator. He has made amazing progress but is still partially paralyzed on his right side similar to a stroke victim. Although he really had to struggle to do anything, he has taken up woodworking and is turning out some incredible stuff. My brother was severely strapped financially by our poor economy so for Christmas of 2011 I decided to give my ShopSmith system to my nephew and see if my many friends were willing to contribute additional tools. While getting all together one of my well to do professor friends said he had gone ShopSmith crazy and bought just about everything, tried woodworking, and decided it was not for him. He asked me to help him sell his tools. We worked out a very fair price and I ended up getting his whole newer ShopSmith with accessories, plus DeWalt planer. My nephew got everything I had and I got a whole new system. I seriously considered then eventually upgraded to the DVR motor on this unit.
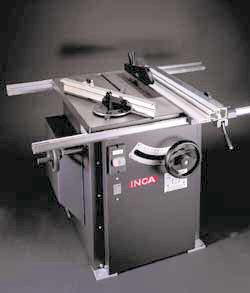
 In the sixties I was an avid modeler loving to build both airplanes and rockets. The most precise woodworking tools available then were the Swiss made Inca machines. They had three sizes of band saw, 11" joiner planner, and three different sizes of saws, one a combination bench top and the other two cabinet saws with power takeoffs to run other equipment. Inca used what was then the latest in aircraft cast aluminum with very quiet motors and bearings. Their tools were well made. I had always wanted a set of these tools after I saw one of my modeler friends do magic with his combination saw. Sadly, one of my engineer friends passed away unexpectedly and I helped his wife sell off that orphaned shop and his tools. I bought from her his Inca cabinet type table saw and Inca joiner planer then not long after bought the big Inca band saw. I liked it so much that I also bought the smaller Inca brand saws, bigger cabinet saw, and lager joiner/planner. At that time my tools shared room with my cars in a garage so I had only a little room. To save room, I built a stand that let me rotate the tool I wanted to us up, lock it in place, plug it and then use it. It had a band shaped blade that spun around supported by three wheels. I really liked both my small and larger Inca tools. These became part of our shared shop when I started a home remodeling business. When I sold that business, I kept the larger Inca table saw and the Inca jointer planer and let the others go. A friend talked me out of also selling him my Inca joiner/planer. I missed those tools and when a friend decided to downsize his shop, I purchased his Inca joiner/planer just like mine. I then stumbled on a fellow who bought a bunch of Inca tools that he planned on refurbishing, started, then quit leaving all disassembled messes. I bought from him all three different sized band saws, one of the first Inca modeling saws which was a tiny thing with all in one plus side sander, and another joiner/planer. Amazingly, he told me the truth when he said all the parts were there plus most of what was needed to make repair. Eventually, I got all working without too much trouble, kept the band saws and sold the rest.
When I bought my Inca tools their reputation was as good if not better than Felder and Festool today. They were incredibly accurate well-built tools for woodworkers that wanted really dead on accurate work. Because these tools are no longer imported and finding parts is tough, I would not consider these as my primary tools, but for someone who can have these as either backups or duplicates, you cannot today buy much better quality or accuracy.
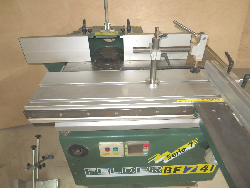
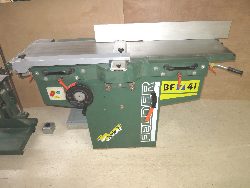 My health took away my ability to do any woodworking in 2000. Other than a few emergency things and rare use by my children, my tools went into disuse. The need to park a third car in the same space quickly shifted the heavy iron from the third garage space to in front of the cars, then over time things got piled higher and deeper. In 2019, nearly twenty years later my docs said I had recovered amply to be able to return to woodworking with lots of limitations. I can only spend so long on my feet, cannot lift much weight, and have to work while wearing a dual cartridge respirator mask. In celebration I gave my heavy duty Robland units away to my budding and very talented woodworking nephew. What he did with my ShopSmith has been incredible. I also managed to gift all but my Inca tools except my jointer/planner away to friends for all the help they have given over the years. With this good news of being able to return to woodworking my lady convinced me to spoil myself with a lightly used really nice shape set of Felder separates that are linked by an umbilical cable. These are monsters and some of the most accurate woodworking tools in the world. Getting them going has been a chore because I need too much help. With lots of help they are now in and finally have the three-phase power they require. I will be adding more LED lights over these tools to help better see the work. I also have to finish up the stainless-steel cyclone and install ducting, but the bottom line is these are pretty much ready to go. With these I was able to get all the different sized shaper spindles and collection of saw blades, so can use my existing tooling. When I bought my Inca tools their reputation was as good if not better than Felder today, but now Felder sets this standard for small shop woodworking. The Felder tools are incredibly accurate well-built tools for fussy woodworkers like me.
When working wood with hand tools the name of the game is utility, sharpness and quality. Poorly made or rough tools are difficult to use. Getting poor steel sharp is near impossible and dull tools take far more force and greatly increase our potential for slipping and having a painful if not bloody accident.
Chisels need a flat back to use as a reference, a sharp blade, and a combination of tempering and flexibility. Properly tempering the right steel creates a blade that will take and hold a very sharp edge. If the tool is too hard the steel becomes brittle and we can easily chip our edge and even break the tool. If the tool is too soft, we spend all our time sharpening. I inherited a set of Japanese chisels that my father bought when we lived in Japan. These were made by a sword master and they are incredibly sharp and tough as can be. I also inherited my father's old chisels from the forties which are mostly Stanley brand plus some odds and ends. I have a set of the Swiss mortising chisels in Imperial sizes for quickly cutting and cleaning out mortises. I personally use and like my own Three Cherries and older Marples chisels, plus an off-brand set of Swiss chisels I found long ago. Finding a really nice wet DMT diamond hone set makes it far easier to sharpen these.
Saws I bought and inherited a full set of some really nice Diston and older saws from the forties and fifties. I also got a sharpening guide and tooth set to keep these all right on. Frankly, I find that when I need a saw today I end up mostly going with my thin toothed Stanley with its "shark toothed" blade, which is really the same kind of blade used on most Japanese saws. I also use a Japanese dovetail and flush cut saws fairly regularly. One of my more recent additions is a diamond bladed drywall saw. It is easy to use, turns near square corners, and is stiff enough to use to help clean out mortise joints.
Squares, Rules and Gauges My family spoiled me with a full set of the Bridge City Tools custom squares, rules, gauges and accessories back in the early nineties to go with my Robland combination machine. These provide an incredibly accurate ways to lay out work, joints, and setup the power tools. They are also so expensive that I would never have bought them for myself, so they hide well protected in their cases and only come out on special occasions. The rest of the time I live with my older Starrett engineering and machinist's squares, rules, and gauges.